
PDQ Deploy Performance Best Practices
This guide can be used to help understand the best practices for performance settings in PDQ Deploy along with common limitations and symptoms of reaching these limitations.
PDQ Deploy has a number of configurable performance settings that you can modify depending on your environment and your PDQ server’s capabilities. There are two primary points where your PDQ Deploy server can run into performance bottlenecks - either the resources on the server itself or the bandwidth available for the server to communicate with the target machines - and PDQ Deploy offers some options that can help with each of these issues. There are four sections of performance settings available, which will each be covered below along with common symptoms of a poorly configured PDQ server:
- Concurrent Target Limits
- Copy Mode
- Service Manager TCP Connection
- Deployment Cleanup
- Performance Pitfalls
Options > Preferences > Performance > Concurrent Target Limits
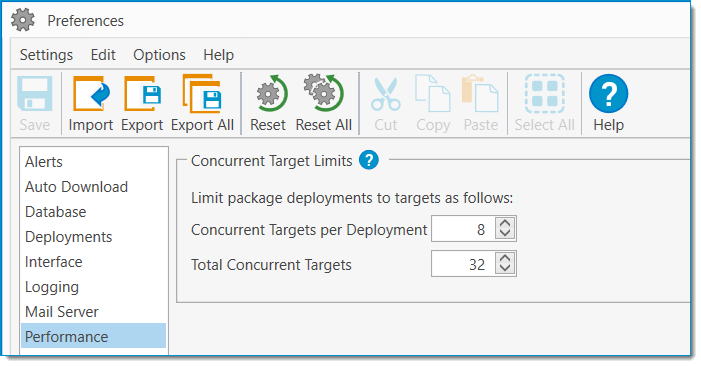
This section of the Performance tab of your Preferences is the most straightforward. There are two settings here, the Concurrent Targets per Deployment option and the Total Concurrent Targets option.
The Concurrent Targets per Deployment option will determine how many computers can be targeted at once time by an individual deployment. If a deployment has more targets than this setting allows for, then targets beyond the configured limit will be put into a Queued state until one of the running targets finishes the deployment. This value is set to 8 by default.
The Total Concurrent Targets option will determine how many computers can be targeted at one time across all deployments. While an individual deployment will never connect to more targets than the Concurrent Targets per Deployment setting is configured for, if your Total Concurrent Targets setting is higher, you can have multiple deployments running concurrently without worrying about one getting delayed by a long-running package from a previous deployment. This value is set to 32 by default.
The default values for PDQ Deploy’s concurrent targets are set fairly low to avoid accidentally overloading a network or server with a new installation, but most modern environments should be able to safely increase these values beyond those defaults. While specific environments and needs will vary, a PDQ server running with the recommended 8GB RAM along with a 100Mbps connection to your target machines should be able to comfortably handle around 60 total concurrent deployments in most cases. This will vary depending on the types and sizes of packages you are deploying, and if you find you are deploying large packages or installing or updating multiple applications at once, it may be worth considering breaking them up into separate schedules, with one application each, so that those deployments can be sent out more incrementally.
Copy Mode
Options > Preferences > Performance > Copy Mode

Your copy mode can be set to either Push or Pull, and selecting the right one can speed up your deployments and save a large amount of bandwidth on your network.
The Push option is best used if your installation files are located on the same server where PDQ Deploy is installed. This is the default copy mode and will transfer files directly from your PDQ server to the target machine. When using the Push option, you can limit the bandwidth that the PDQ server will dedicate to copying files to your targets. This limit is shared across all file copies being performed by the server, and the default is set to 50% of the server’s link speed.
The Pull option is best used when your installation files are stored on a different server than PDQ Deploy is being hosted on. This will instruct the target machine to download the necessary files directly from your file server. If the files are located on a separate server but you have the Push option selected, then those files will be transferred first from the file server to the PDQ server, and then copied a second time from the PDQ server to the target machine. Using the Pull option allows these files to only be copied once, but your Deploy User will need to have permission to access those files on the file server, whereas otherwise the background service user’s credentials would be used to access those files. The Pull option does not support bandwidth throttling.
Service Manager TCP Connection
Options > Preferences > Performance > Service Manager TCP Connection

IMPORTANT: These are Windows settings and are system-wide. Any changes made here will affect all other applications on the server which make use of remote service manager connections and the Windows service control.
The Service Manager TCP Connection section manages how Windows manages RPC connections. Because these settings will affect all applications on the server, it is recommended that these values only be changed if you are seeing recurring issues with the connection times in PDQ Deploy.
The Default option allows Windows to manage the RPC connection settings as it normally would. Unless these settings have been changed by a group policy or other application, the default behavior is for Windows to first attempt RPC over TCP. If that connection isn’t successful, the connection will be retried over named pipes after 21 seconds.
The Disabled option will prevent Windows from ever attempting an RPC over TCP. Connections will only be attempted using named pipes.
The Timeout option allows you to configure a custom timeout interval for RPC over TCP connections. This can help improve the time it takes PDQ Deploy to connect to targets if you find that your deployments are often taking longer than 20 seconds. The default value with this option selected is 10 seconds, but it can be modified as well.
Although it is recommended that RPC/TCP be enabled for the best performance of PDQ Deploy, blocking this type of connection is a fairly common security practice. If you know that RPC/TCP connections are blocked in your environment, you’ll find the best performance from PDQ Deploy with this option set to Disabled. If RPC/TCP connections are allowed on your network but you still see connections often taking longer than 20 seconds to initiate, shortening that timeout interval will allow PDQ Deploy to fall back to named pipes more quickly and get your deployments running sooner.
Deployment Cleanup
Options > Preferences > Deployments > Cleanup
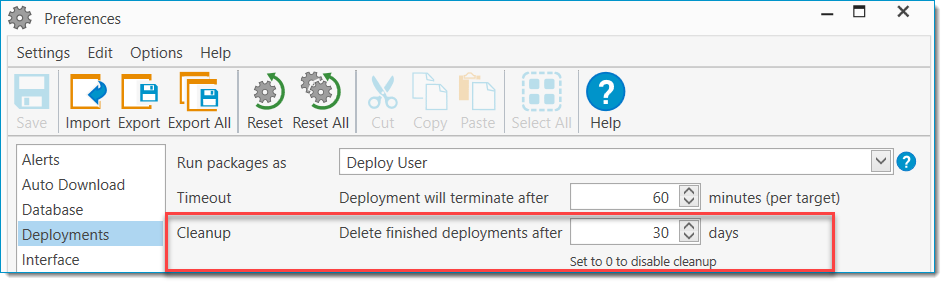
One final option that can negatively impact the performance of your PDQ console is the Cleanup setting which, unlike the other options discussed here, is located in the Deployments tab of the Preferences window. This setting determines how long PDQ Deploy will save information about past deployments, after which they will be removed from the Deployments window in order to prevent the size of the PDQ Deploy database from climbing indefinitely.
By default, this value is set to 30 days. Smaller environments with less frequent deployments can easily extend this value, but if you have a large environment or very frequent deployments, you may want to lower this setting. It is possible to disable automatic cleanup of your deployments by setting this value to 0, but this is not recommended in most cases.
Since a long deployment history is the most common cause of an extensively large database by a wide margin, an easy way to tell if you should consider lowering this setting is to look at the size of the Database.db file found in the %ProgramData%\Admin Arsenal\PDQ Deploy folder on your PDQ server. (This database file can be moved, so your database location may vary if you have done so.) As a general rule, you’ll probably want to consider lowering this setting if your PDQ Deploy database is exceeding or approaching 200MB in size.
Performance Pitfalls
Even with a finely-tuned PDQ Deploy server, errors can sometimes occur that may point to some performance issues. This can especially happen if you have recently made any large changes to your environment, but even normal growth and evolution can sometimes make it necessary to re-evaluate your performance settings. Although many of these issues can also have causes unrelated to reaching a performance limitation, a common symptom of performance-related issues is if rebooting your PDQ server or restarting the background service on a regular basis tends to cure things temporarily. Some common issues and likely causes are below.
Connection Errors
“An established connection was aborted by the software in your host machine”
OR
“No connection could be made because the target machine actively refused it 127.0.0.1:<your_configured_port>”
When these errors show up, the most likely culprit is the size of your database. PDQ Deploy is not designed to save deployment histories indefinitely, and if you have a long deployment history or a large number of deployments being made in a short amount of time, you can overload the PDQ console. By default PDQ Deploy will save deployment histories for 30 days, but you can configure this in the Deployments tab of your Preferences. A quick way to check if this might be the case is to look at the size of the Database.db file found in %ProgramData%\Admin Arsenal\PDQ Deploy on your PDQ server. (This database file can be moved, so your database location may vary if you have done so.) The Deployment Cleanup section of this article describes what a healthy cleanup schedule usually looks like. This can also be caused by having an excessive number of total concurrent deployments or if you have a large number of deployments sitting in the retry queue.
Deployments Stuck in “Connecting” Status
If your deployments are hanging in the “Connecting” status for a long period of time after the deployment initiates, there may be issues making RPC/TCP connections from your PDQ server to your target machines. The “Service Manager TCP Connection” section above has a detailed explanation of how to resolve that issue. If you are still seeing connections stuck in “Connecting” after following those instructions, it is possible that your PDQ server is reaching its CPU’s limit or that your network bandwidth is limiting these connections. You should check your server’s CPU usage and the latency between the server and your target machines.
Integration Issues With PDQ Inventory
Because of the deep integration between PDQ Deploy and PDQ Inventory, issues with one application often bleed over into the other. Because PDQ Deploy tends to take a more active role in interacting with your target machines than PDQ Inventory does, these issues are usually most visible in PDQ Deploy. If you have both PDQ products installed together and have met the requirements for integration as described in the article "Integration: PDQ Inventory With PDQ Deploy Requirements" but are still seeing issues with the integration features, there could be some performance problems in either application. Common errors of this type include heartbeats not triggering schedules in PDQ Deploy, “Step not run due to Unable to Verify Collection Membership Condition.”, or “Integration with PDQInventory has been closed.”
In addition to any of the other issues described above, this can also occur if you have poorly configured deployment targeting in your schedules within PDQ Deploy. If you’re not seeing symptoms of any of the other issues here, you will likely want to check how you are targeting collections for deployment in your schedules.
It is normally best to maintain a larger number of very specific schedules than to maintain fewer bulk update schedules within PDQ Deploy and to stagger these schedules when possible so that they don’t all reach out from PDQ Deploy to PDQ Inventory at once. Generally, if a package is attached to a schedule, it is best to avoid having package-level conditions set to verify collection membership in PDQ Inventory. Instead, a collection should be created that verifies all conditions you want to check for that schedule, and that collection should be used as the schedule’s target. Doing this accomplishes two things that help each program run more smoothly.
First, it allows PDQ Deploy to determine which computers need the packages in that schedule with a single request to PDQ Inventory. A broader targeting with package-level conditions requires a check with PDQ Inventory initially to gather the computers in the target collection, and then a check for each computer at each package and step that has an additional collection membership condition. This can quickly grow the number of times PDQ Deploy is querying PDQ Inventory’s collections and consume a large amount of resources in doing so.
Second, this prevents PDQ Deploy from attempting to connect to target computers that do not need the packages being deployed by the schedule. Package and step-level conditions are not evaluated until after PDQ Deploy has made a connection to the target machine, so relying on those conditions to filter out computers from your deployments pushes the verification back until more resources and time have already been spent. This also results in a large number of failed deployments and can quickly fill up your deployment history, leading to issues similar to those covered in the Deployment Cleanup section above.
See Also
Article - How It Works: PDQ Deploy