
Custom Scanner Best Practices
Purpose:
You wish to know the best practices surrounding custom Scanners in order to avoid performance issues caused by long scan times and/or database bloat.
Resolution:
NOTE: The two terms Scan Profile and Scanner are used throughout the article. To differentiate these terms, a single Scan Profile may contain multiple Scanners.
Targeted Scanning
By targeting a custom Scanner to the exact data that is needed, you will avoid performance issues caused by long scan times and/or bloating the database with unnecessary data. Take the following scenario when trying to determine what the RDP listening port is set to using a Registry Scanner.
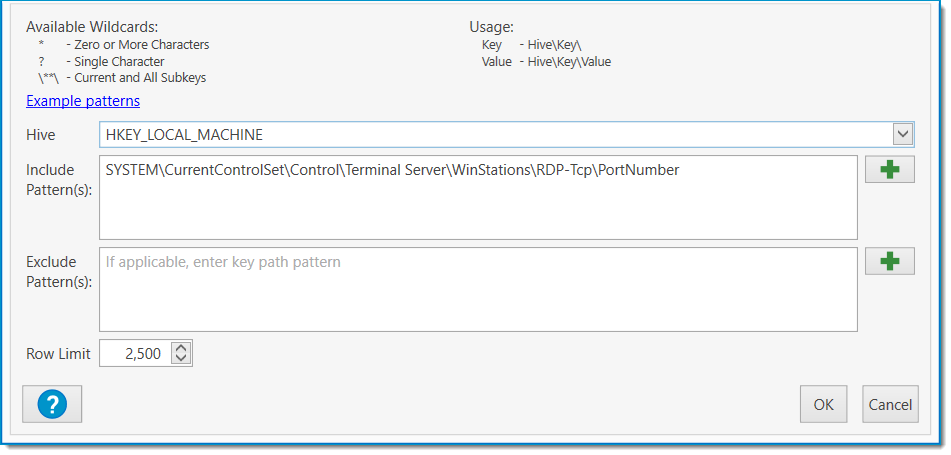
This value may be found in the following location:
HKEY_LOCAL_MACHINE\SYSTEM\CurrentControlSet\Control\Terminal Server\WinStations\RDP-Tcp\PortNumber
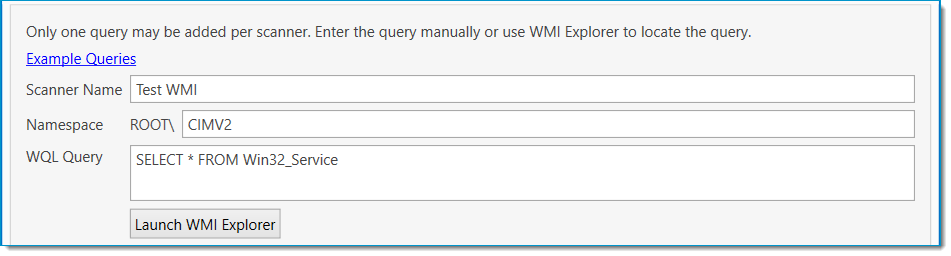
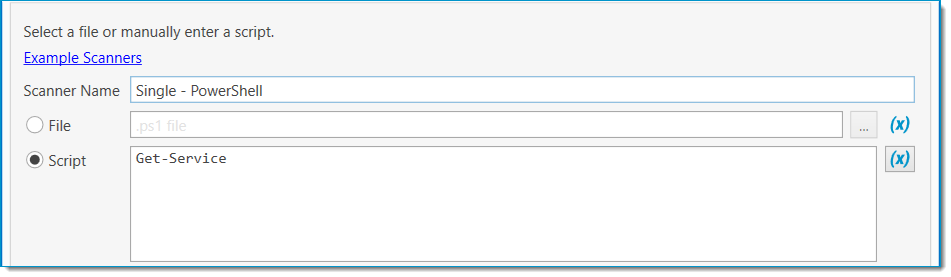
The best way to configure the Scanner would be to only return the value PortNumber as in the below example.
However, if the Scanner were configured like below to target the key, you would end up with somewhere around 85 values returned to the database, including PortNumber, if a single machine were scanned.
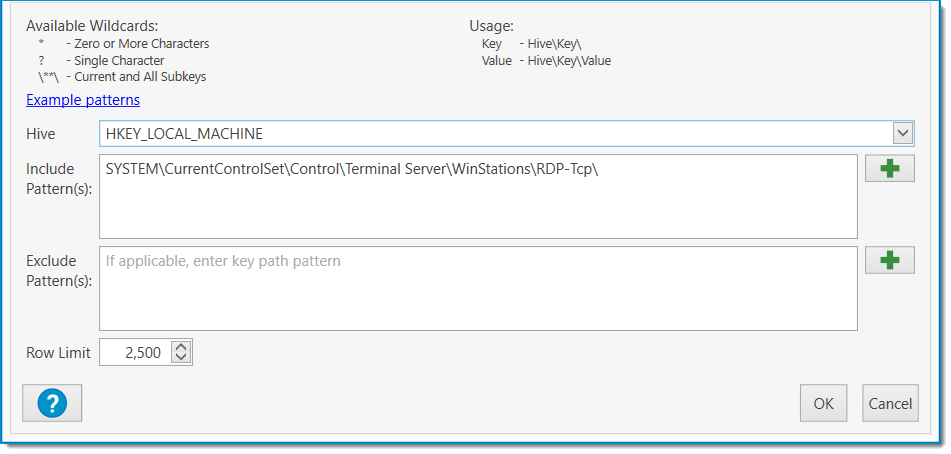
There is already quite a bit of data in PDQ Inventory, but when a custom Scanner returns broad unfocused data, multiplied by the number of computers in a given environment, you can quickly and exponentially increase the PDQ Inventory database size, which in turn translates to a decrease in overall performance.
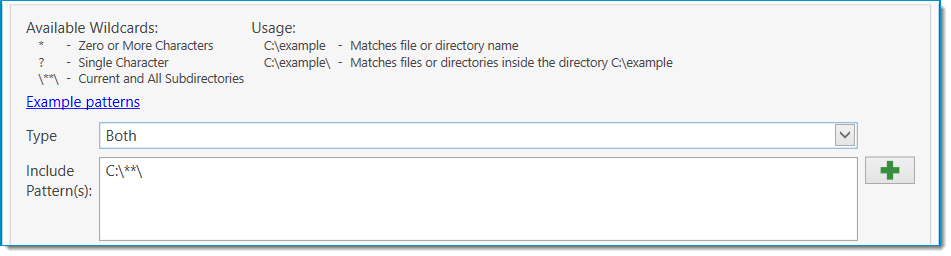
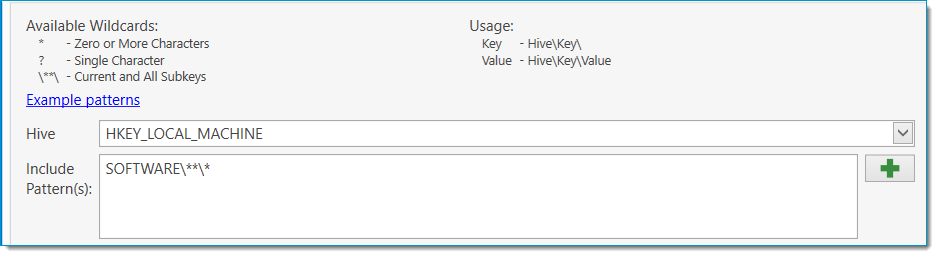
Scanners configured with only wildcards close to the root or an otherwise broad scan, as seen in the below examples, should be avoided at all costs. If any one Scanner returns more than 50 or so entries, we advise to reevaluate the configuration of the Scanner.
Files & Directories:
Registry:
WMI:
PowerShell:
Unique Scan Profiles
In order to have a more organized console and to avoid seemingly inconsistent results, custom Scanners should ideally exist in their own unique scan profiles, and no two custom Scanners should query the same data.
Multiple Scanners with overlapping queries may result in database/performance issues brought on by unnecessary duplicate data, but these overlaps are especially problematic with File & Directories and Registry Scanners since the data will only show a single instance in the page within the Computer Details window even if associated with multiple Scan Profiles. In the following example Shortcut.lnk has been brought in by two different Scan Profiles, Scan 1 and Scan 2.

After Shortcut.lnk has been deleted on the target and a subsequent scan ran using the Scan 1 profile, the expectation may be that the result would also drop from PDQ Inventory, but it remains since it is still associated with another Scan Profile. Once all associated scan profiles have been ran after a file or registry entry has been removed from a target, in this case the profile Scan 2, the result will be then removed from PDQ Inventory. By default, the Scan Profile(s) column is the last column in the view so you will need to scroll over or reorder the columns to more easily view this.

Purging Data
If you find yourself in a situation where it takes a while to load any of the custom Scanner pages in the Computer Details window, or you just want to purge all the data and start fresh, there are a couple ways to delete data brought in by custom Scanners. The first method, which only applies to the File & Directories and Registry Scanners, is to manually delete the scan results by right-clicking the results and choosing Delete Scan Result(s). The second method is to delete the individual Scanner itself which will delete the associated data across all your inventory. There is no way to restore the Scanner or scan data once deleted other than restoring from a backup, or recreating the Scanner and rescanning the endpoints. Because of this, it is recommended to backup the database beforehand. The following steps detail how to purge custom scan data from PDQ Inventory while retaining the Scanners themselves.
- Backup the database Options > Preferences > Database > Backup Database
- Duplicate any File & Directories/PowerShell/Registry/WMI Scanners that you wish to reuse
- If not already, modify the duplicates to target the exact data you wish to collect
- Delete the original and any remaining Scanners that weren't duplicated to delete all associated data that was collected from them
- Optimize the database to clear empty space and reduce database size Options > Preferences > Database > Optimize Database
See Also:
Article - Inventory Files & Directories Scanner: Examples & Usage
Article - Using the PowerShell Scanner