
TEMPLATE - Autodesk
This is a TEMPLATE package that REQUIRES YOU to make additional MODIFICATIONS to complete the package: A template package contains the framework for a package, but removes the actual installation\configuration files to comply with EULA restrictions regarding licensing and redistribution.
Name: Autodesk
Publisher: Autodesk
Supported Operating Systems: Win 10, Win 11
Supported Architecture: 64
Creating the Installer
The first thing we need to do is create an installer with the applications and configuration information for our deployment. This process can be completed on Autodesk's website, www.autodesk.com. Once you've logged in, click on your profile icon in the upper right-hand corner of the screen and then click on Products and services.
The Products and Services page lists all the products you have access to. This page is also where we will begin building our installer. This guide is based on Revit 2022, but the procedure should be similar and adaptable for multiple Autodesk products. Keep in mind that if you have access to multiple Autodesk products, you may want to download additional Autodesk templates and build each application separately (instead of combining them) to avoid massive file sizes.
1. With the "All Products and Services" page open, click on the Custom Install link in the menu on the left side of the screen.
2. Click on the Create new button to begin creating the custom installer.
3. Select the products you want to add. In our case, this is Revit:
4. Select the latest version of the product, or you can choose a specific version.
5. Set your content path locations. You can also configure this information in a custom ini file which can be added in a later step.
6. Select the optional components you want to include. To reduce the file size, you may want to unselect language packs that you don't need.
7. If you are using a Revit Server, you can enter the server's information in the Accelerator IP address or Name field.
8. Enter your custom Revit.ini file in the Custom Revit ini file name field. Make sure you add your ini file to the deployment image folder once the deployment image has been downloaded: \\pdq-servername\repository\PDQTemplates\Autodesk\image
9. Expand the Extensions and Content sections and select the components you want to add to the package. Again, the more components you add, the larger the installation size will be.
10. When you are finished customizing the package, click Next. This will bring you to the install settings panel.
11. Give your package a name.
12. Click Deploy.
13. In the Deployment image path: field, enter the location to your UNC path to your PDQ Deploy repository. By default, the repository location is \\pdq-servername\repository\. We'll use the path \\pdq-servername\repository\PDQTemplates\Autodesk\ (You'll need to replace the pdq-servername with your own)
14. Next, click on Advanced options.
15. Select Use symbolic links and select I agree to the Terms of Use (after you finish reading them, of course).
16. Click Download.
17. Once you click download, an EXE file should download onto your computer. Copy this file onto your PDQ Deploy server, double-click it, accept any UAC prompts, and download to: \\pdq-servername\repository\PDQTemplates\Autodesk\
18. This will download the contents for the installation in your repository. This process can take a very long time. Ensure you have sufficient storage space where your repository resides because the Revit package alone will be close to 15GB. Once the contents are downloaded to the repository, you'll find an image folder, a log folder, a batch file, and a summary file.
19. The last thing we need to do before we can build our deploy package is modify the Install Revit.bat file. Right-click on that file and click Edit. Now, remove rem from in front of the path under Install the deployment silently section, and add rem in front of the path under Install the deployment with basic UI section. This is what the end result should look like.
20. Now open the Autodesk Template package and ensure that the install step is pointing to the correct bat file we modified: \\pdq-servername\repository\PDQTemplates\Autodesk\Install Revit.bat
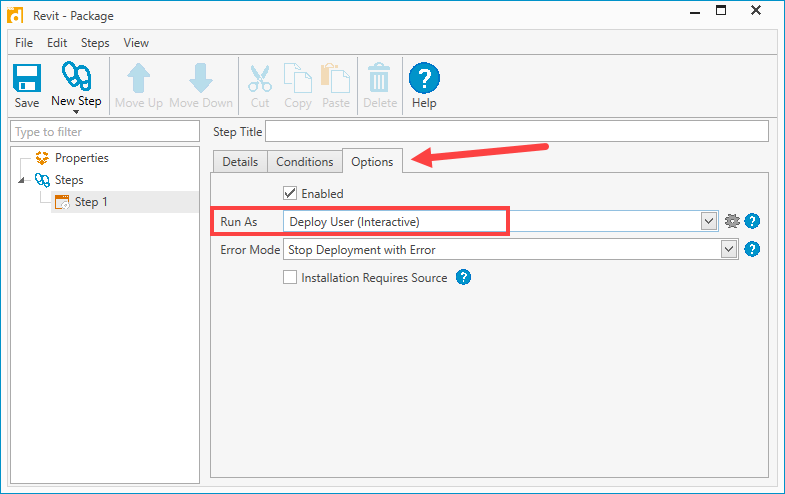
21. Click the Options tab, and next to Run As, select Deploy User (Interactive).
22. Test deploying the package to a few clients and confirm proper installation.
See Also:
Blog - https://www.pdq.com/blog/how-to-deploy-autodesk-applications/