Creating Custom Packages
Purpose:
You need to deploy an application that is not available in the Package Library.
Resolution:
Most applications that can be silently installed can be deployed with PDQ Deploy. This guide covers how to create a custom package.
Contents:
Package Folder(s)
Package folders allow you to organize your packages in PDQ Deploy. There is a folder named Packages in the tree by default, To create a new package folder:
- Right click an empty space (or another folder to create a child folder) in the tree and selecting New Folder
- Use the shortcut Ctrl+Shift+F
- Select File > New Folder in the menu
Note: Using PDQ Deploy in Central Server Mode will create a new folder called Private Packages for each Console User, that will only be accessible to that user.
New Custom Package
Custom packages in PDQ Deploy provide the tools to quietly deploy applications unavailable in the Package Library, and many more device management tasks, from a single console.
To create a new Custom Package:
- Right click an empty space (or a folder you want the package in) in the tree and select New Folder in the context menu
- Use the shortcut Ctrl+N
- Select File > New Folder in the menu
Package Properties
New packages open to the Package Properties page. This is where the primary settings for a package are configured. Any Conditions or Options configured in the Properties page will be inherited by the package steps unless configured within the same tab per-step. The Offline settings apply to the whole package, and cannot be modified per-step.
Details Tab
The Details tab contains basic information about the package.
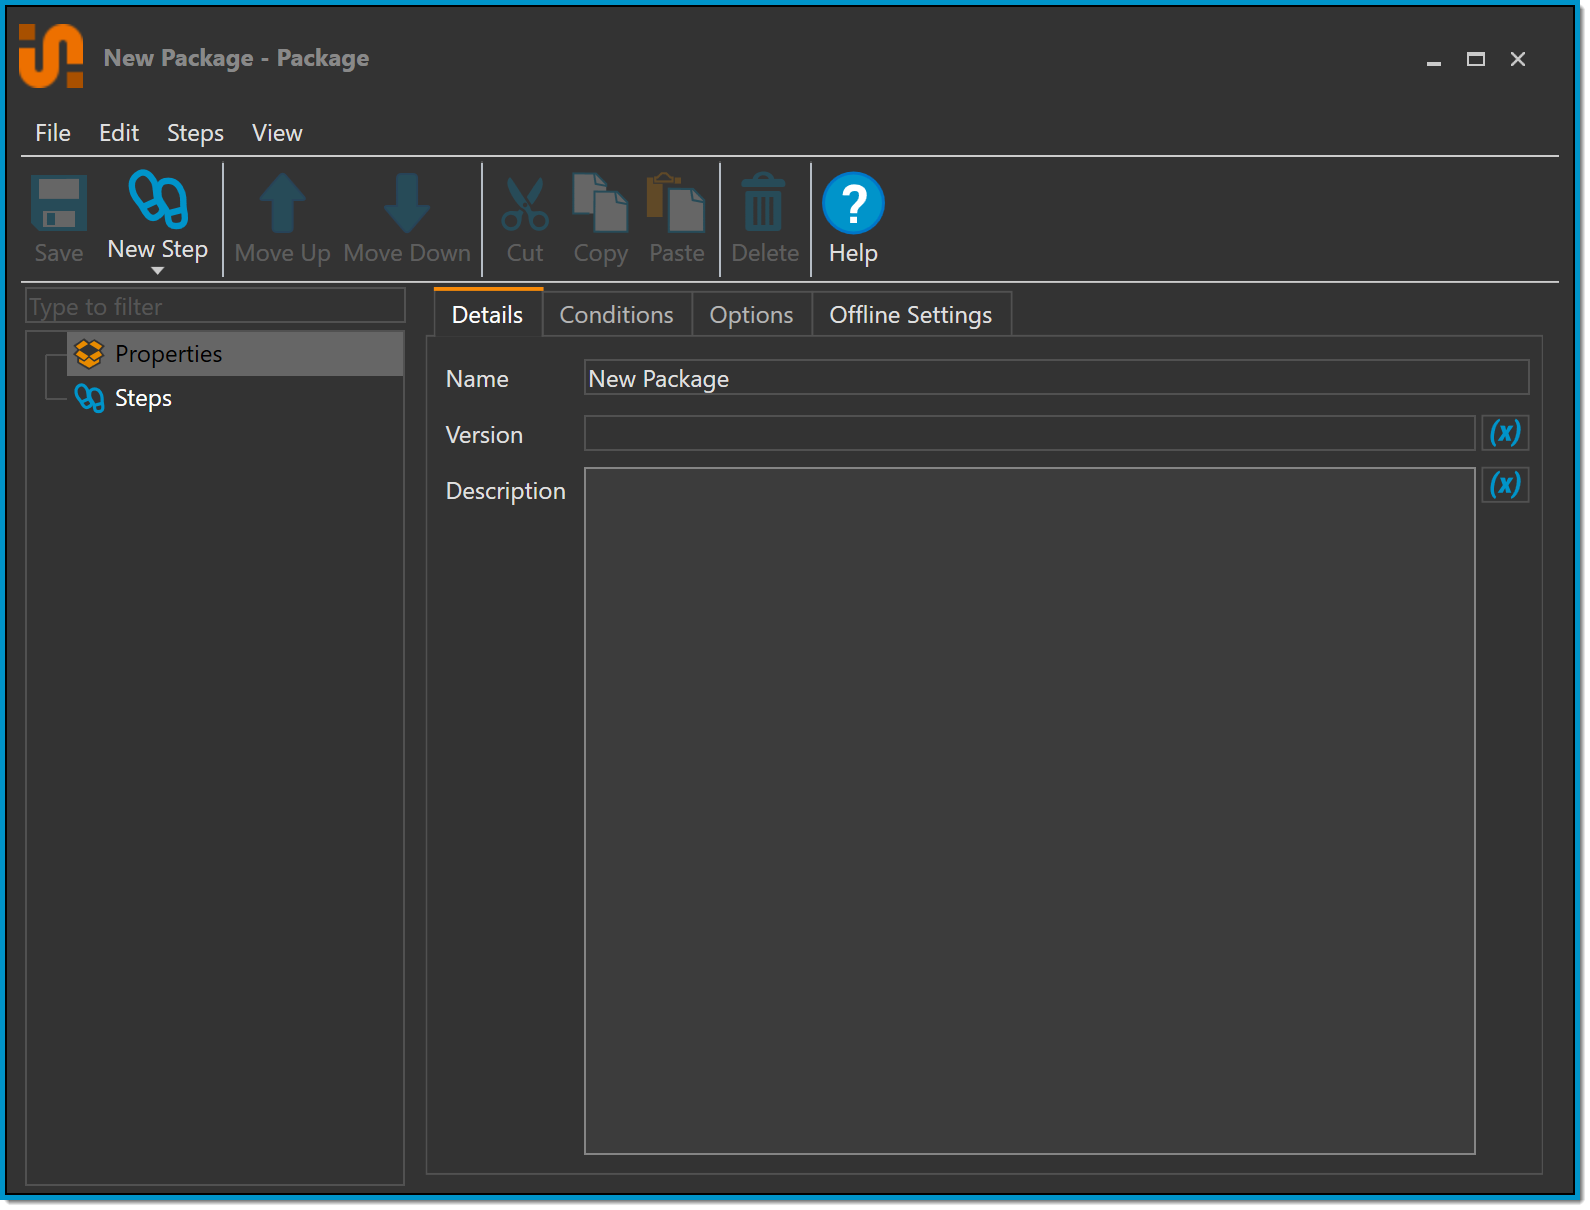
The Details tab includes the following fields:
-
Name - The name of the package
- Leaving this field blank will save the Package as New Package and will not append incrementing numbers for packages with the same name.
- Version - (Optional) The version of the application being packaged
- Description - (Optional) A description of the package
Conditions Tab
The Conditions tab allows you to configure certain conditions that a target computer must meet to receive a deployment. Target computers that do not meet the package's conditional requirements will not proceed with the deployment.
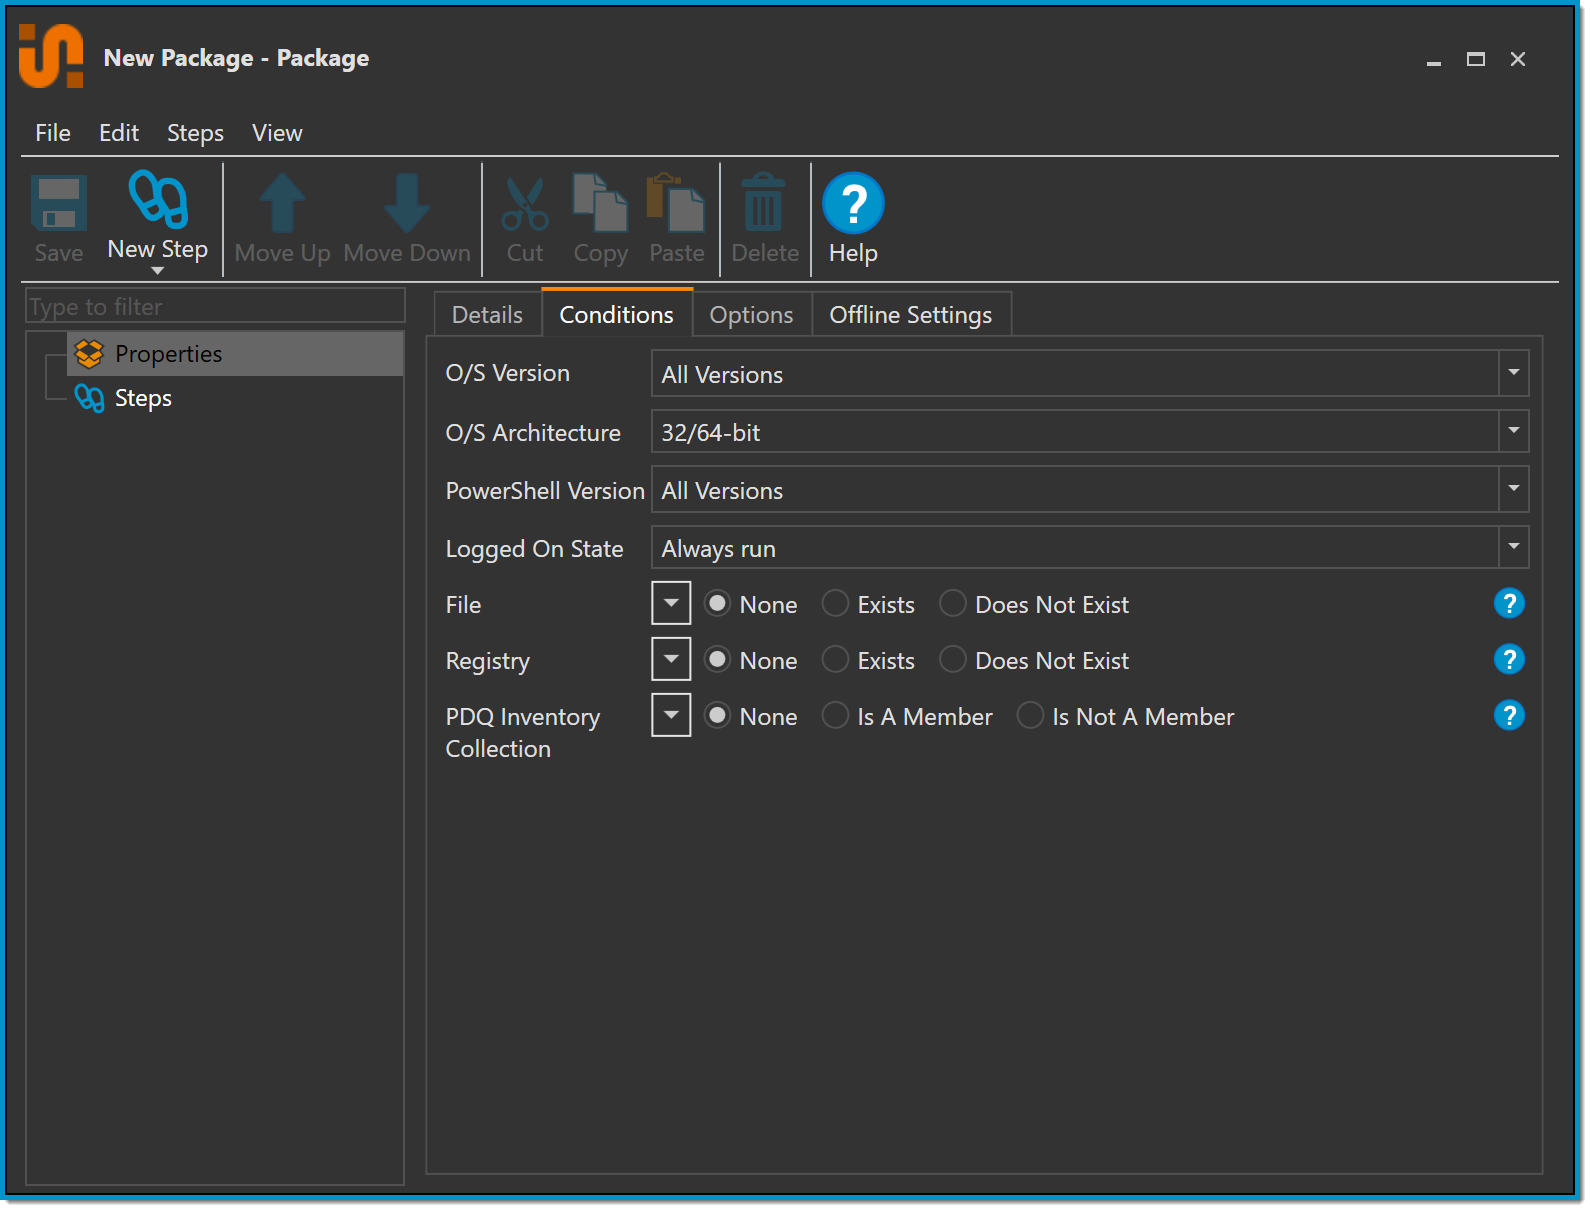
The available conditions are:
- O/S Version - Select the Windows Operating System version(s) this package (or step) applies to
- O/S Architecture - Select the Operating System Architecture(s) this package (or step) applies to
-
PowerShell Version - Select the PowerShell version(s) required on the targets for this package (or step) to apply
- Only applies to Install & PowerShell steps
- PowerShell version 1 is not supported in PDQ Deploy
-
Logged On State - Select whether or not a user needs to be signed into the target computer for the package (or step) to run
- Always run
- Only run if no user is logged on
- Only run if a user is logged on (including Locked and Disconnected)
- File - Check the target computer for the existence of a specified file and determine if the package (or step) should run depending the presence of the file
- Registry - Check the target computer for a specified Registry value and determine if the package (or step) should run depending on the presence of the value.
- PDQ Inventory Collection - Check if the target computer is or is not in a specified PDQ Inventory Collection and run the package (or step) depending on the target's collection membership.
Options Tab
The Options tab of a package allows you to configure some deployment and performance settings that will override what is configured in Options > Preferences.
Note: The options described here apply to New Packages and Custom Packages; Auto Download Packages contain additional options.
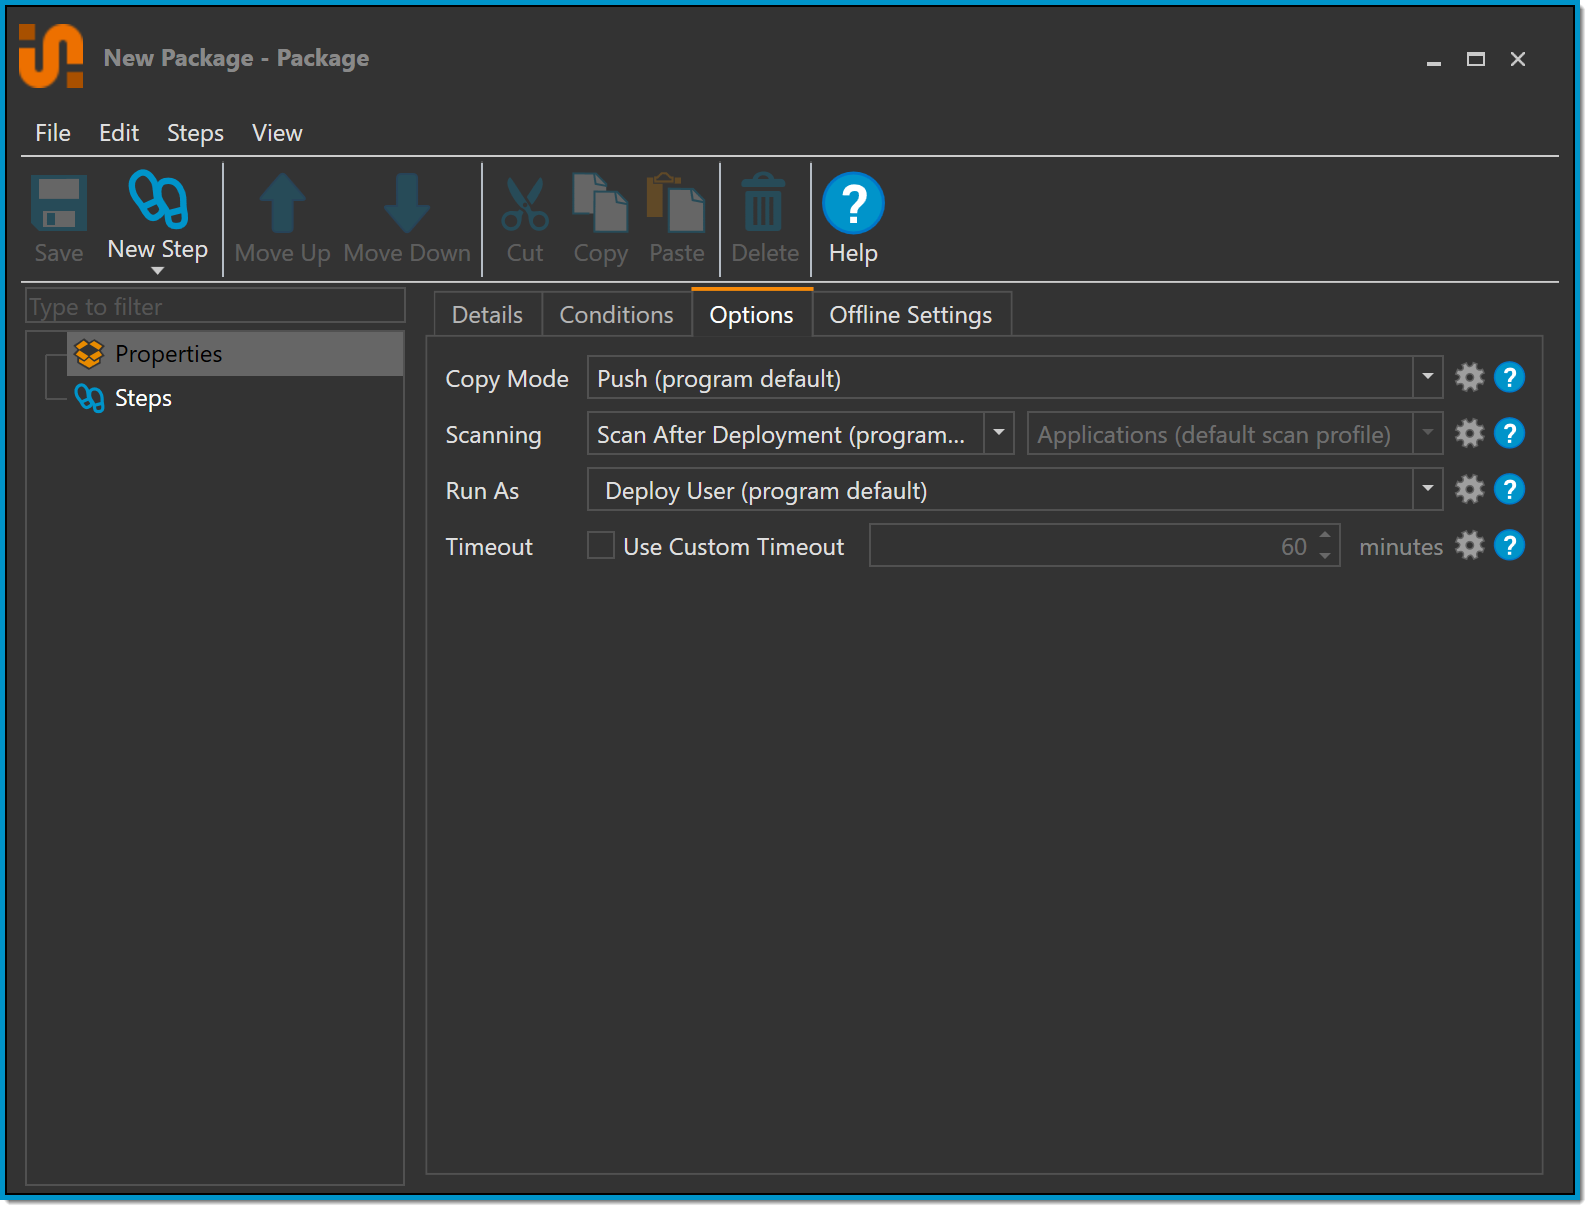
The available options are:
-
Copy Mode - Determine how the required package files are copied to the targets
-
Push - The Background Service copies the package files from the repository straight to the target computers
- If the repository does not reside on the same server that PDQ Deploy is installed on, the files will first be copied to the PDQ server and then pushed to the target computers.
-
Pull - The PDQ Deploy Runner Service on the target computers will retrieve the package files from the repository directly.
- This method is best for situations where the package files are not hosted on the same server as PDQ Deploy.
- For more details about the Copy Modes, see the article PDQ Deploy Copy Modes
-
Push - The Background Service copies the package files from the repository straight to the target computers
-
Scanning - Determine if PDQ Inventory should scan the target computers after the deployment, and which Scan Profile to use.
- Because most deployments are installing or updating applications, it is recommended to use a lightweight Scan Profile (e.g. the pre-configured Applications Scan Profile) for most post-deployment scans.
-
Run As - Determine the user this package (or step) will Run As.
- This Option is also available in the Options tab of each step. Setting this option per-step will override the Package setting.
- The Run As options are:
- Deploy User (Program Default) - The Default Deploy User, configured in Options > Credentials
- Deploy User - Selecting this option allows you to select which Deploy User to use for the package. Click on the preferences button to the right of the drop-down to open the Deploy Users menu.
-
Deploy User (Interactive) - Allows for executing deployments that include both silent and interactive steps.
- The difference between this setting and the Deploy User setting is that the Windows process running the deployment is ran in an interactive session.
- This setting will use more processing resources on the target computer and is only recommended to use as-needed at the individual package level.
-
Local System - The deployment is ran as the Local System account on the target computer.
- PDQ Deploy connects to the target computer using the Deploy User credentials, copies the specified files, creates the PDQDeployRunner service, then instructs the service to log on as Local System.
- This setting is used only for installations that require Local System. These types of deployments are very rare. Consequently, it is recommended that you apply this setting only as needed at the Package level.
- Packages using this setting cannot access network resources.
-
Logged on User - The PDQ Deploy Runner Service attempts to run the package as the currently logged on user.
- This setting is used to deploy applications that are installed per user or when the Logged on User needs to provide information for the deployment to succeed such as a license key. It can also be used to modify the HKEY_CURRENT_USER registry hive for the Logged on User or to access user-specific settings such as %APPDATA% or the Logged on User's user directory. These types of deployments are highly specialized. Consequently, it is recommended that you apply this setting only as needed at the Package level.
-
Timeout - How long the deployment runs before timing out on the server.
- This setting only applies to the duration of the deployment on the target computer and does not account for the time spent copying files to the target.
-
Offline Settings Tab
The Offline Settings tab of a package determines how the deployment will handle offline targets.
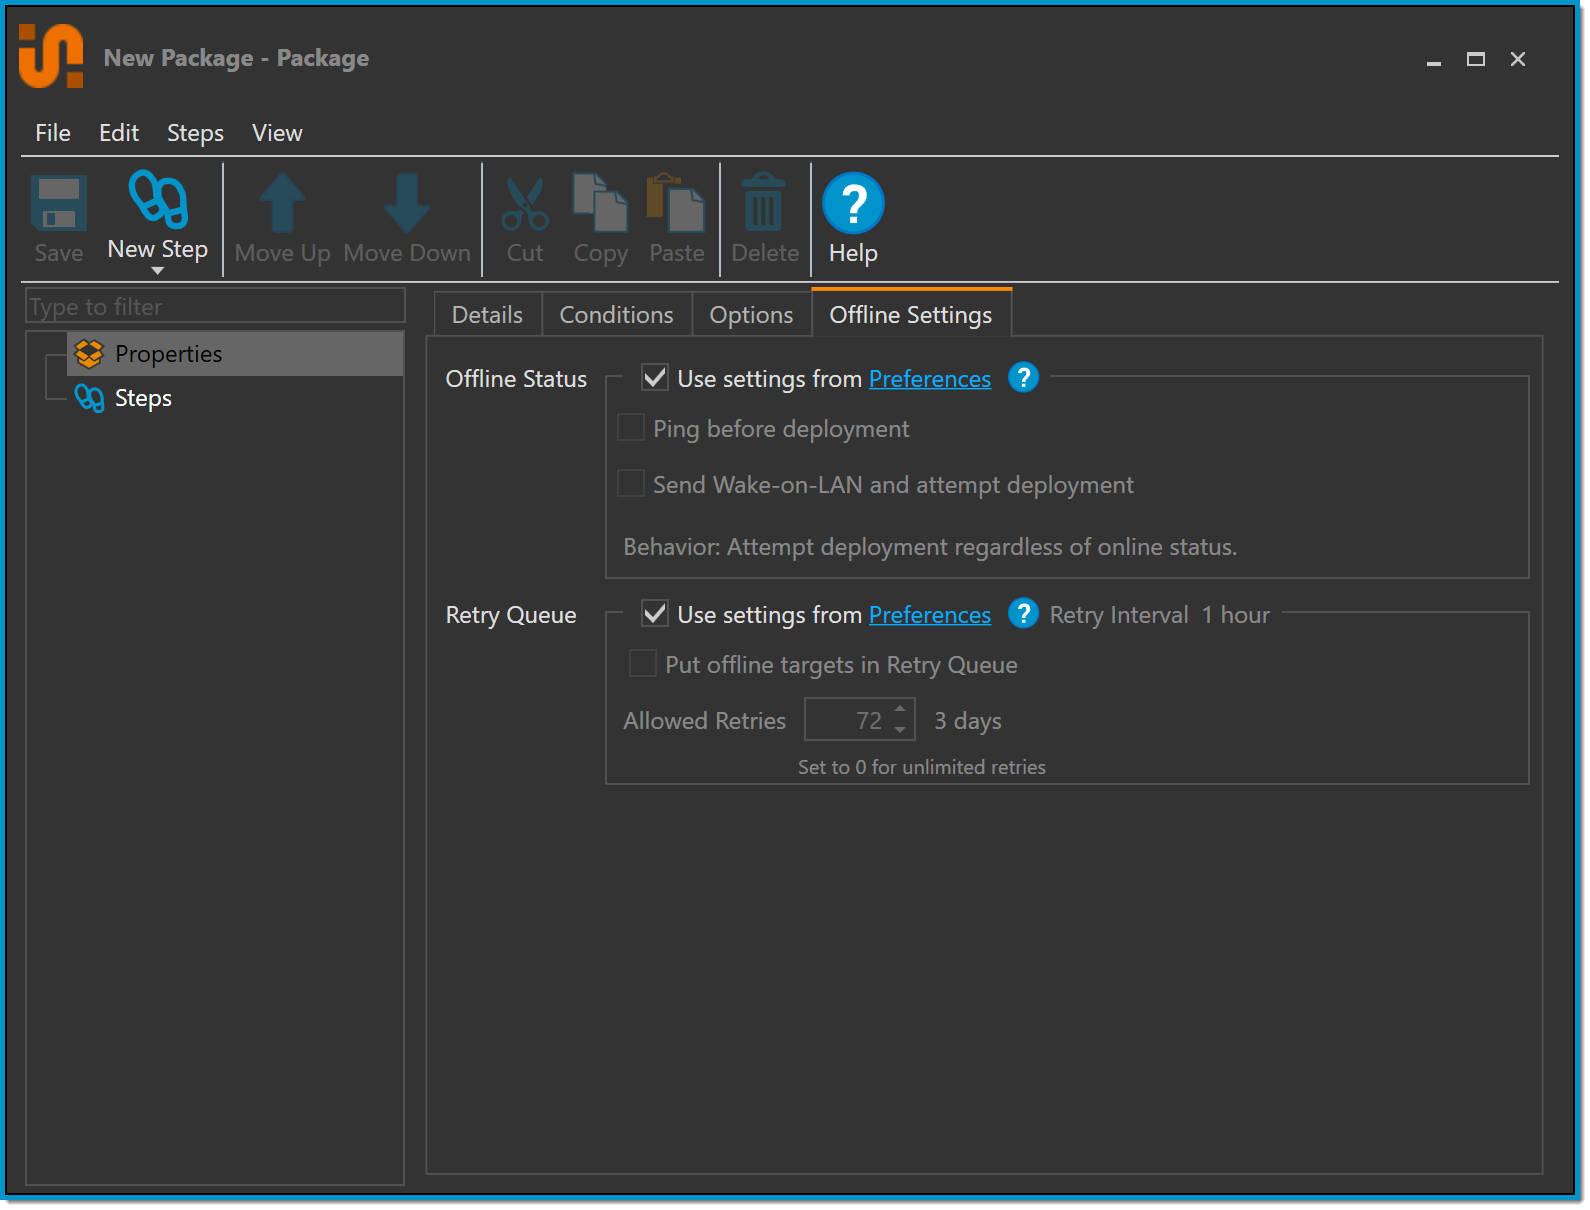
The available Offline Settings are:
-
Offline Status - Configure how PDQ Deploy determines a targets online / offline status before attempting the deployment.
- If no settings are checked, PDQ Deploy attempts the deployment without confirming the target's online / offline status
-
Ping before deployment - Performs a ping (ICMP echo) to all addresses returned by DNS before attempting the deployment on the first to respond. If the target does not respond to the ping within 2 seconds, then the deployment is not attempted on that target.
- When this is not selected, PDQ Deploy attempts the deployment regardless of the online or offline status of the target computer.
-
Send Wake-on-LAN and attempt deployment - Attempts the deployment then sends a Wake-on-LAN to offline target computers. The deployment is attempted again if it comes online. After 5 minutes if the computer is still offline, the deployment will be attempted again.
- In order for this option to work, PDQ Inventory must have the MAC address of the target computers' NICs.
Package Steps
Package Steps allow you to configure what actions are taken, and in what order, on your target computers during a deployment.
Every step has three tabs, Details, Conditions, and Options. The Details tab is different for each step, but the Conditions and Options tabs are the same for every step. All step descriptions below are referring to the step's Details tab.
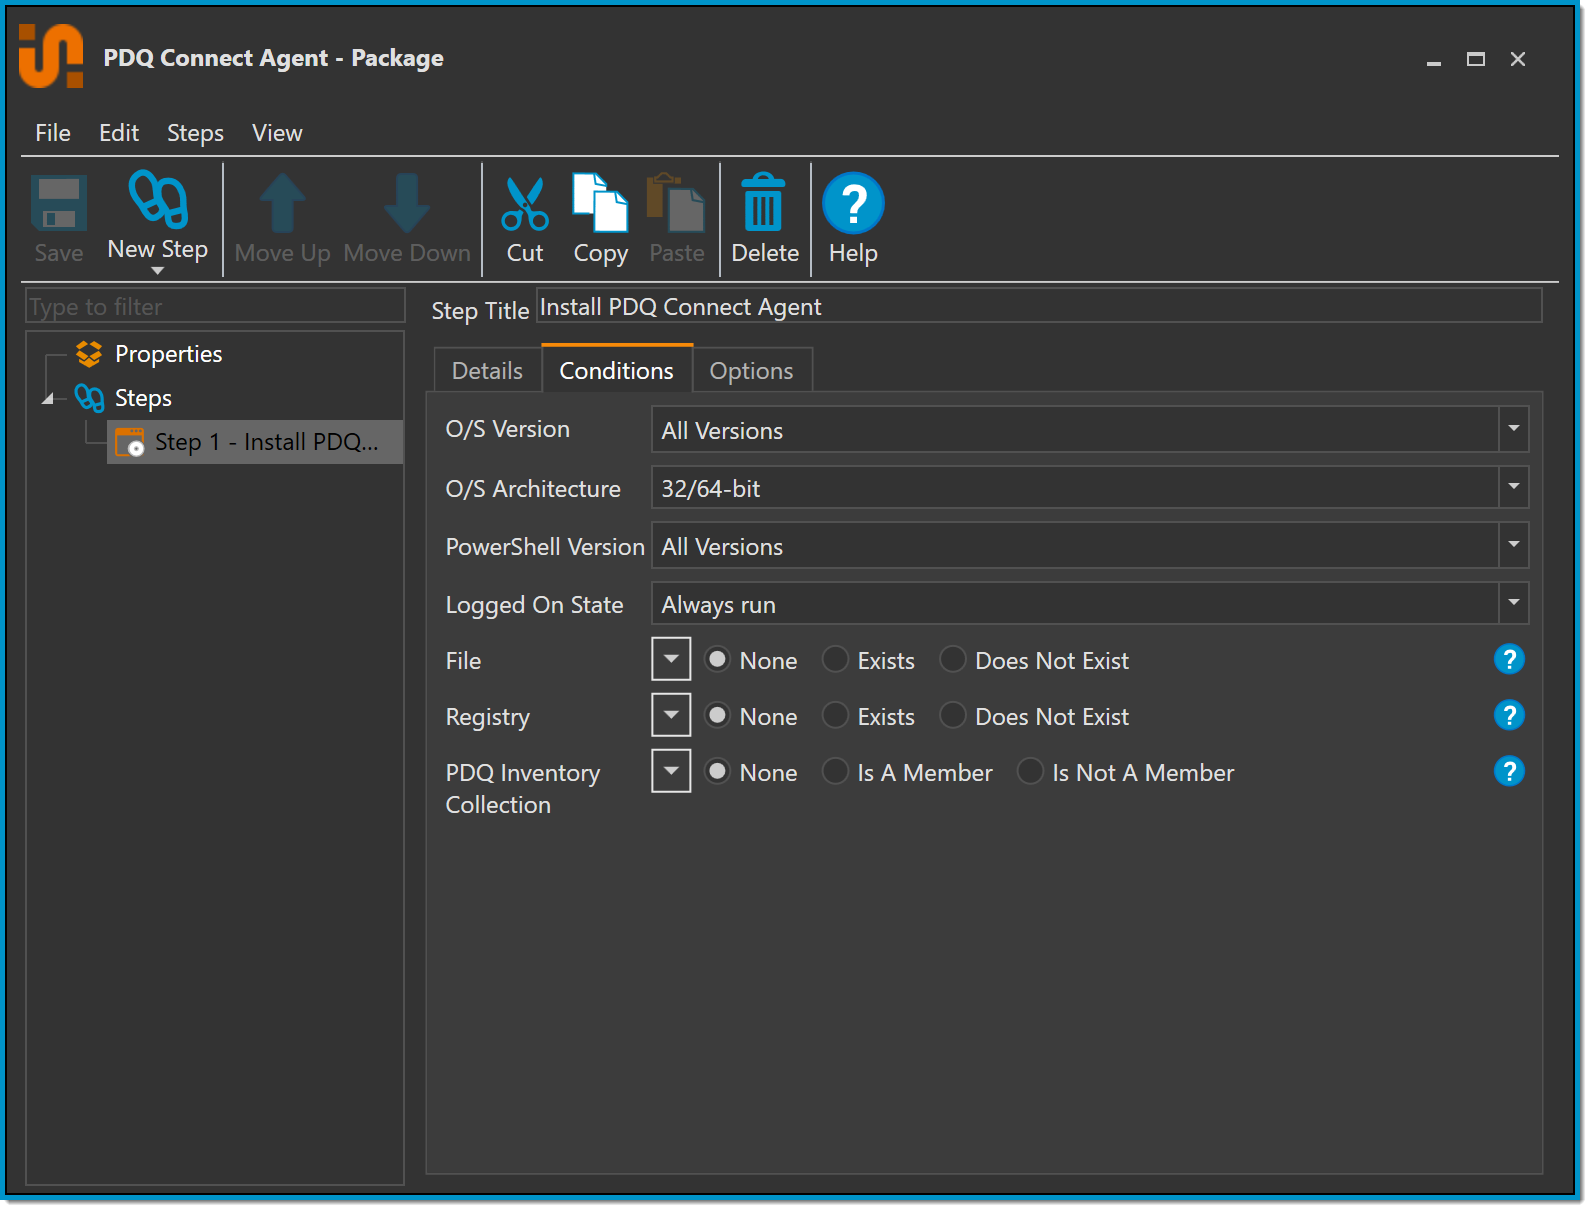
Step Conditions Tab
The Step Conditions tab contains the same conditions as the Package Properties. Conditions configured per-step apply after the conditions configured in the Package Properties, and will only affect that step.
Step Options Tab
The Step Options tab contains additional settings that affect the step's actions during a deployment.
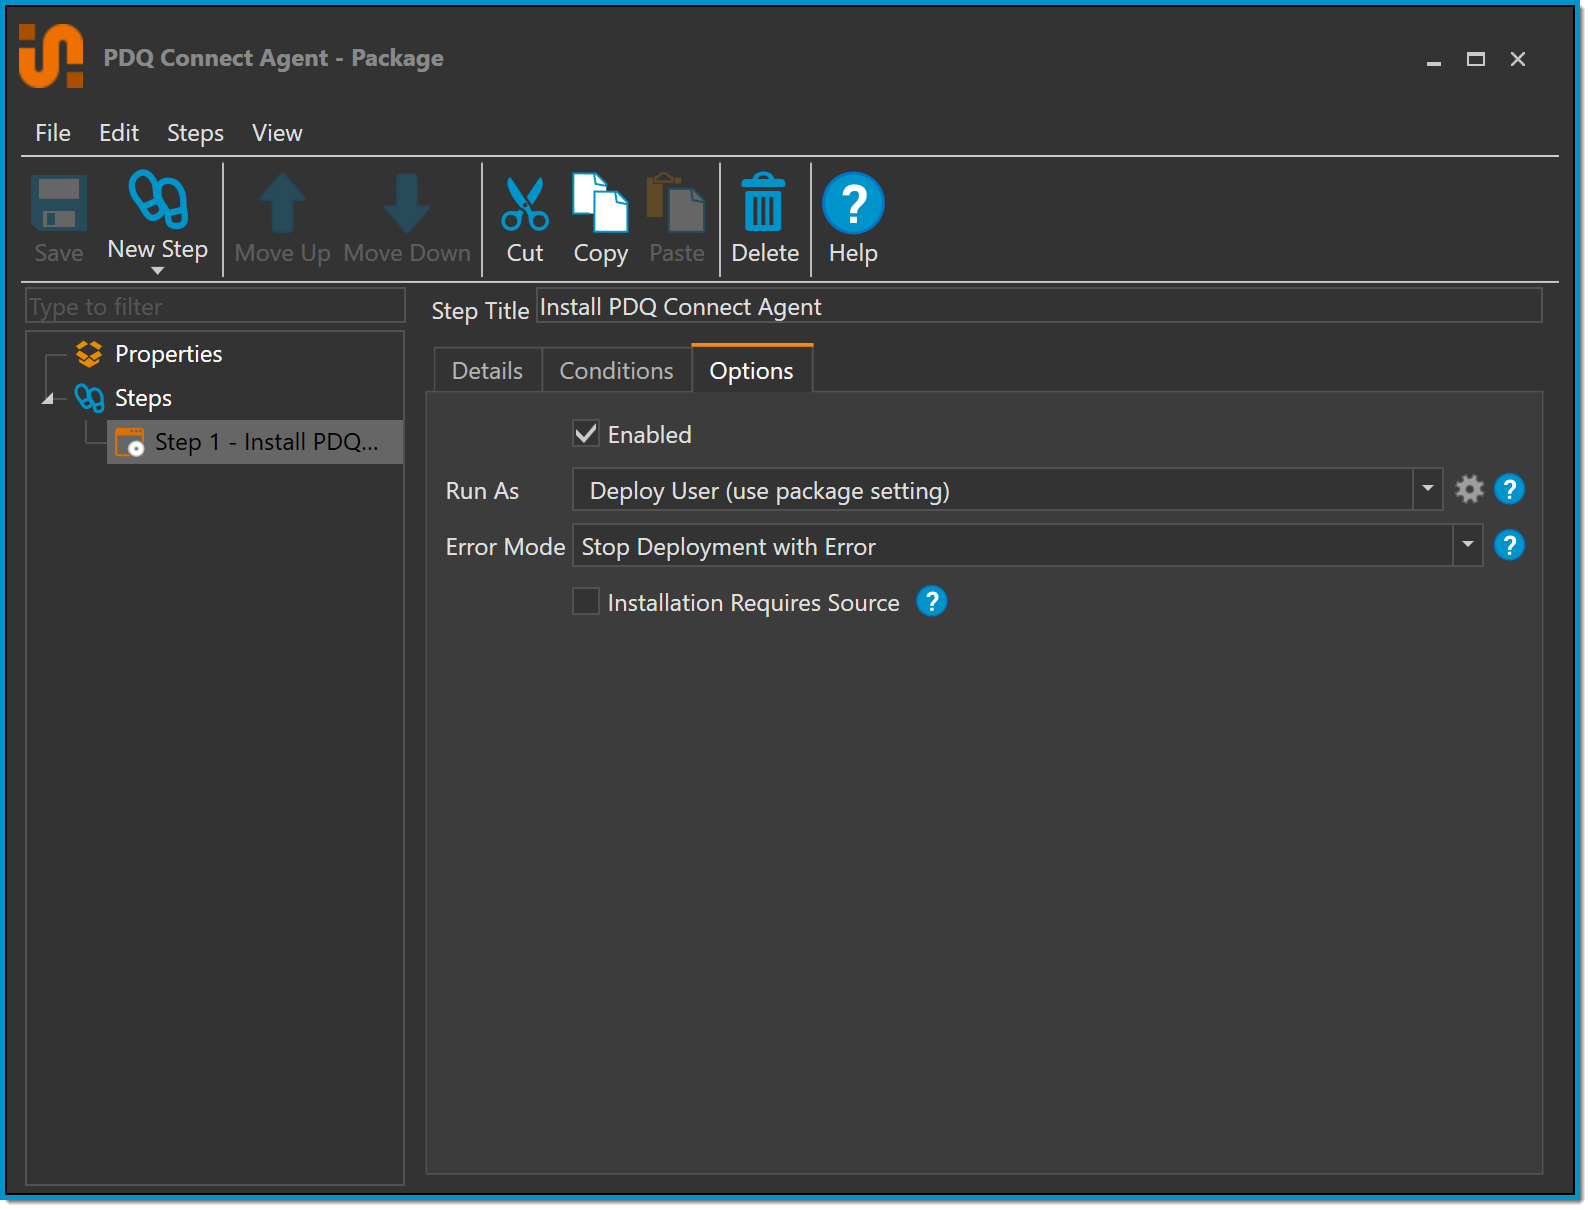
The Options tab of each step contains four settings.
- Enabled - When unchecked, the step will be disabled during deployment, but it will not be deleted and can be re-enabled at any time.
-
Run As - This is the same as the Run As option in the package properties.
- This option will override the Run As option configured in the package properties.
-
Error Mode - This determines how the package handles an step failing.
- Stop Deployment With Error - Stops the deployment when a step fails and return an error message.
-
Continue - Continue the deployment if the step fails.
- Error messages for the failed step can be found in the Output Log
- Stop Deployment with Success - When a step fails, stop the deployment and report success.
-
Installation Requires Source - Use this option for installations that require a source path if additional features, modifications, or repairs need to be made locally by the end user. Files will be automatically saved on the target computer to ADMIN$\AdminArsenal\PDQDeployRunner\Installers\{GUID}. The root directory is defined in Preference > Target Service.
- Note: This option is only available for an Install Step.
- Note: The Installation Requires Source feature is not intended as an installation source and should be used sparingly. Usage of this features should occur only for applications that specifically require a local copy/path of the original installation files in order to perform post-deployment programmatic modifications.
Install Step
The Install Step installs an application on a target computer using an install file.
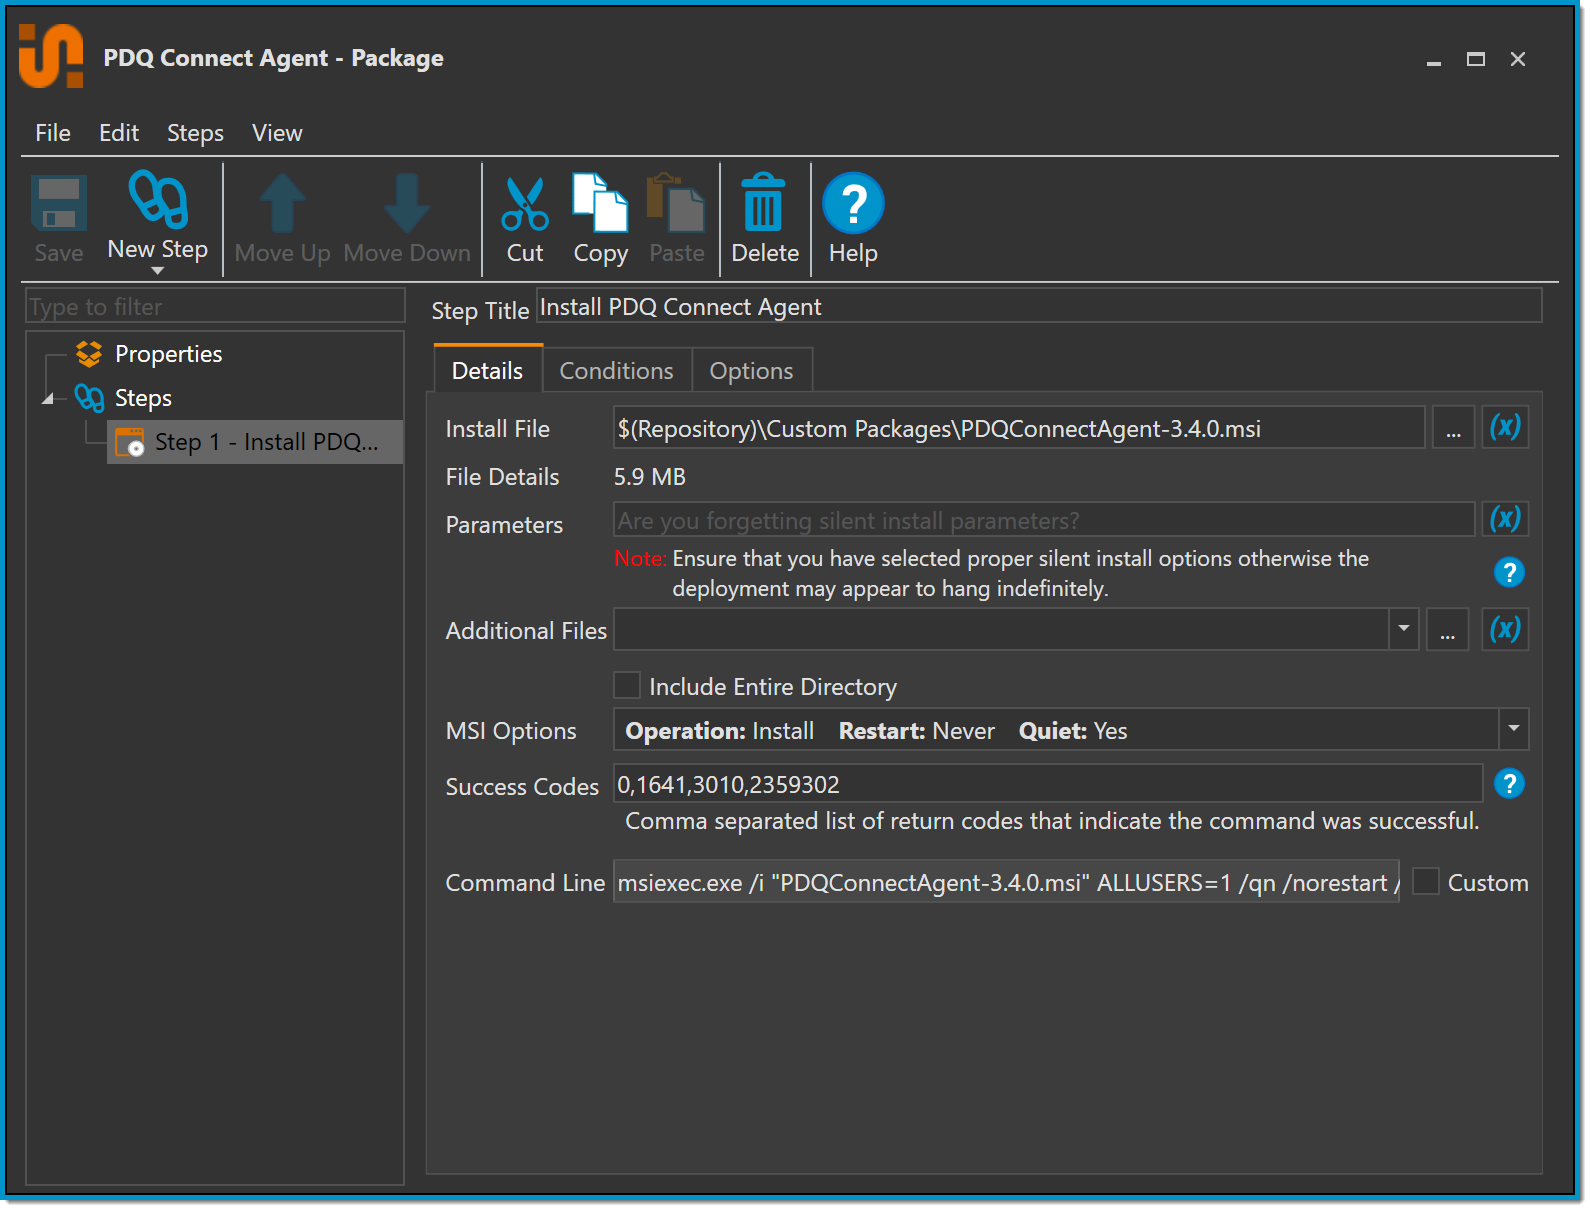
Install Step Properties
-
Install File - The install file for the application being deployed.
- The following install file types are supported:
- .msi
- .msu
- .msp
- .exe
- .vbs
- .bat
- .ps1
- .reg
- The following install file types are supported:
- Parameters - Parameters to include in the command line used for the installation.
- Additional Files - Select any additional files required for the installation. Files selected here will be placed in the same directory on the target as the install file.
- Include Entire Directory - Includes all files and sub-directories in the same folder as the install file. When selected, this option will retain the directory structure when copied to the target.
-
MSI Options - For MSI, MSU, and MSP installs there are a number of options which can be passed to msiexec (.MSI, .MSP) or wusa.exe (.MSU) as part of the installation.
- Operation - Determine if this package is Installing, Repairing, or Uninstalling an application
- Restart - Select Never, Always, Prompt, or (not set) to determine the target restart action for in the Install Step. Using (not set) will not include a command line parameter for restarting and will use the installer's default option.
- Quiet - Sets the msiexec silent install command line parameter (/qn)
-
Success Codes - Executable and batch installs typically report success with a return code of 0 (zero) but some also return success with other return codes. Usually these are warnings or other informational return codes that you can safely ignore. When creating an install, you can provide a comma-separated list of return codes that are considered a success. Any install that does not return one of these codes is flagged as an error and the return code displays.
- The default codes of 1641 and 3010 are MSI codes indicating that the installation was successful but a reboot was started (1641) or a reboot is required (3010).
- For a comprehensive list of Windows system error codes, see https://msdn.microsoft.com/en-us/library/windows/desktop/ms681381(v=vs.85).aspx.
-
Command Line - The command line that will be ran on the target computers to perform the installation.
-
Custom - Check this box to write a custom command line to be used for the installation.
- This options is rarely necessary. Adding additional command line parameters is best configured with the Parameters field.
-
Custom - Check this box to write a custom command line to be used for the installation.
Command Step
The Command Step executes commands on the target computers. Command Steps are executed on the target computers using cmd.exe, giving access to environment variables and other features of cmd.exe
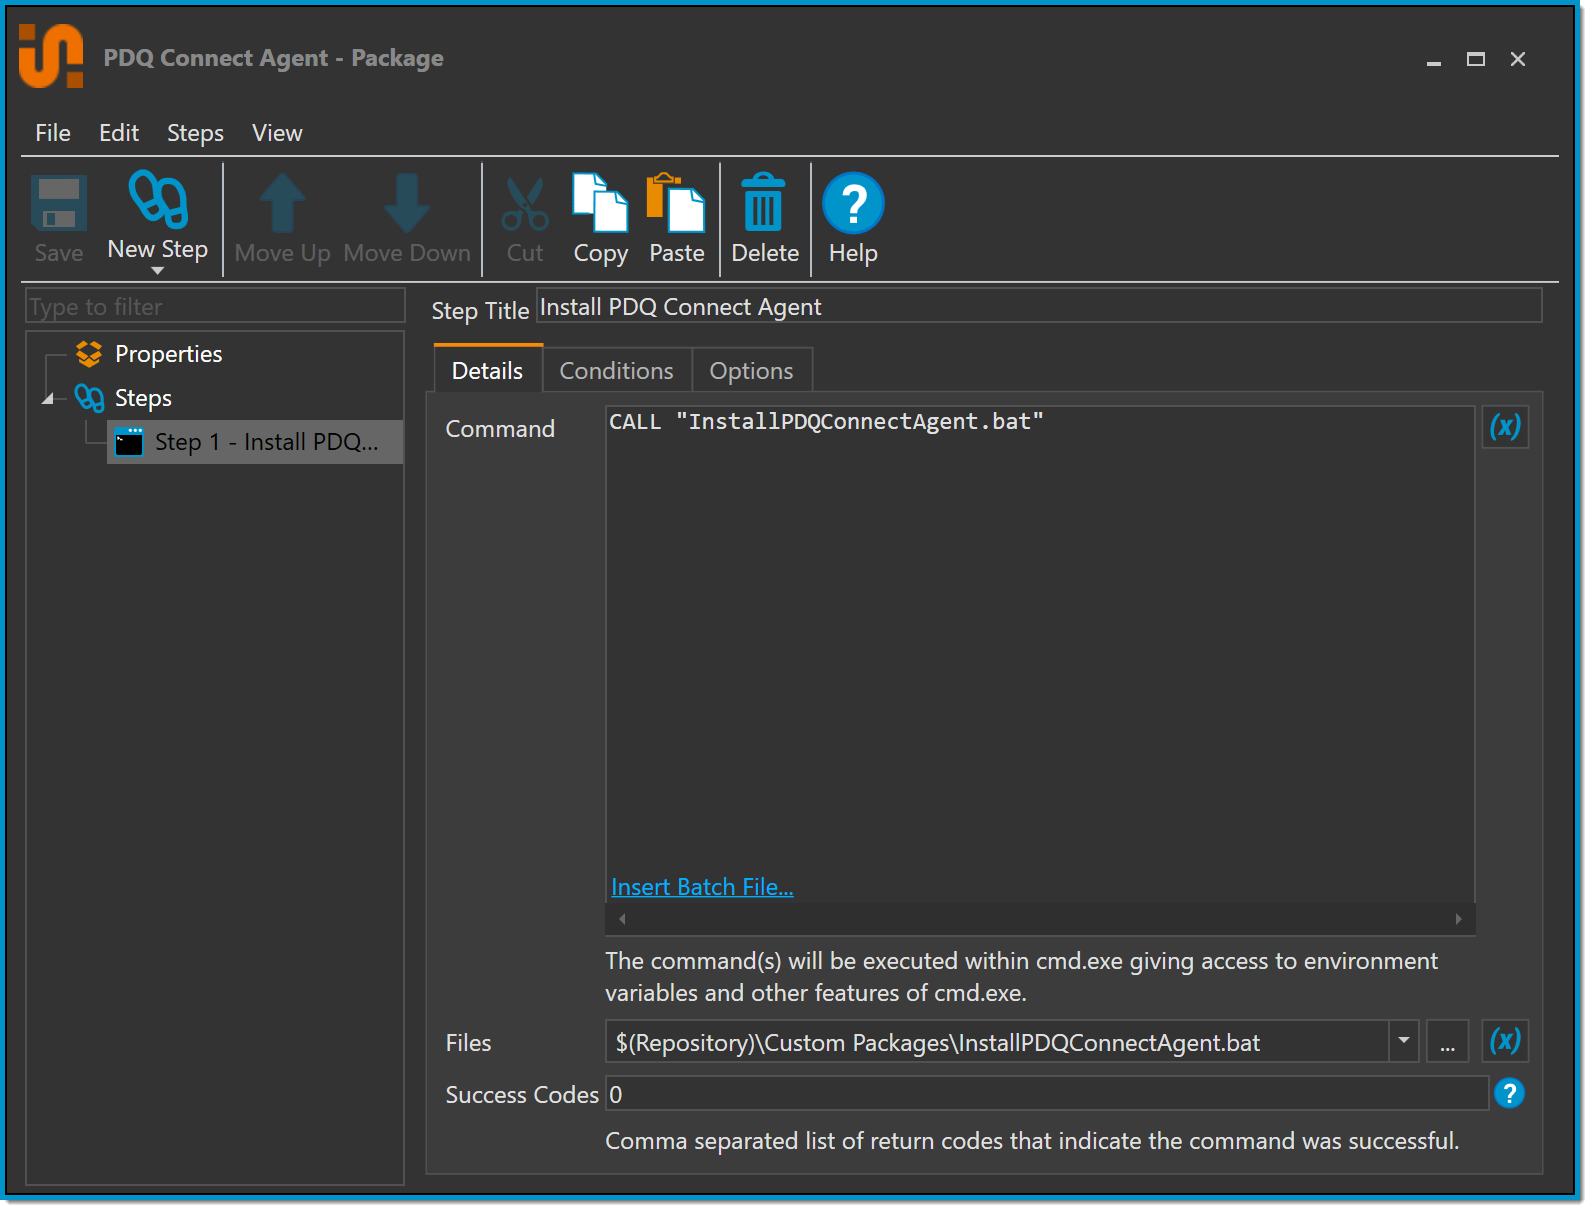
Command Step Properties
- Command - Type the command to be ran on the target computers here. Using the Insert Batch File button allows you to select a batch script to call from the Command Step. The file selected will be included in the Files field.
-
Files - Select any additional files you wish to include with the command.
- This is useful for running utilities that may not be installed on all target computers or for including configuration files.
- These files are copied into the %SystemRoot%\AdminArsenal\PDQDeployRunner\service-n\exec directory on the target computer.
-
Success Codes - The success or failure of the command is determined by its return code, referred to as an %ERRORLEVEL% when running batch files.
- A command is considered a success if the command's return code is listed in the successful Return Code column of the Deployment Status window.
- For a comprehensive list of Windows system error codes, see https://msdn.microsoft.com/en-us/library/windows/desktop/ms681381(v=vs.85).aspx.
PowerShell Step
The PowerShell Step executes commands on the target computers. PowerShell Steps are executed on the target computers using powershell.exe, giving access to environment variables and other features of powershell.exe.
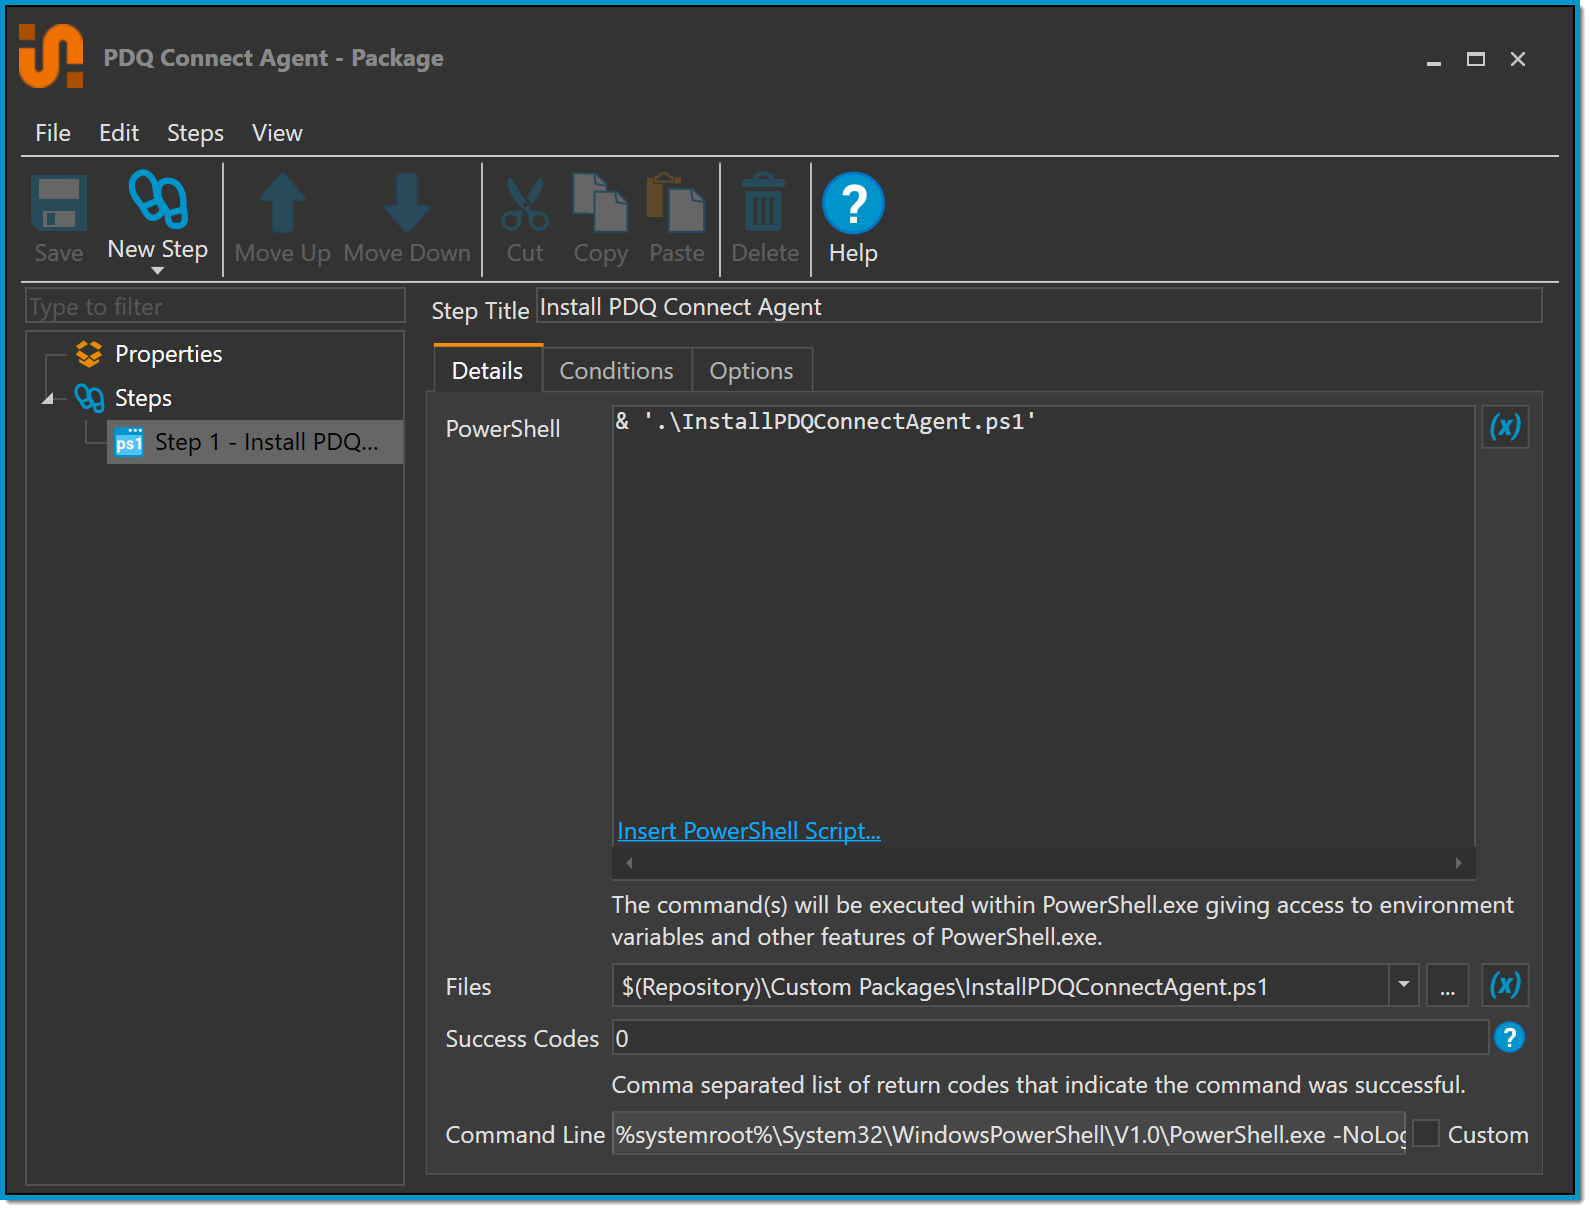
PowerShell Step Properties
- PowerShell - Type the command to be ran on the target computers here. Using the Insert PowerShell Script button allows you to select a PowerShell script to call from the PowerShell Step. The file selected will be included in the Files field.
-
Files - Select any additional files you wish to include with the command.
- This is useful for running utilities that may not be installed on all target computers or for including configuration files.
- These files are copied into the %SystemRoot%\AdminArsenal\PDQDeployRunner\service-n\exec directory on the target computer.
-
Success Codes - The success or failure of the PowerShell step is determined by its return code. A command is considered a success if the return code is listed in the Success Code box.
- For programs not native to PowerShell, PowerShell has a built-in variable called $LastExitCode that stores the last return code. This behaves similar to the %ERRORLEVEL% from a regular command line.
- For native PowerShell cmdlets, no return code is given. Any native PowerShell cmdlets that encounter an error will return PackagePowerShellErrorException for the step.
-
Command Line - The command that will be executed on the target computer.
- Custom - Check this box to modify the command to be ran.
Note: The PowerShell step includes some basic error handling.
Nested Package Step
The Nested Package Step executes another package within a step. Select the desired package use for the Nested Package Step from the Package dropdown.
Packages can be nested so that a package can nest a package that nests other packages; however, circular references are not allowed and attempting to deploy a Package that indirectly nests back to itself will fail.
A new package can also be created with two or more Nested Packages by selecting multiple packages in the navigation pane (Shift+click or Ctrl+click), then selecting Create new package nesting these packages in the Multiple Packages Page. A New Package window will open with each selected package as its own nested step.
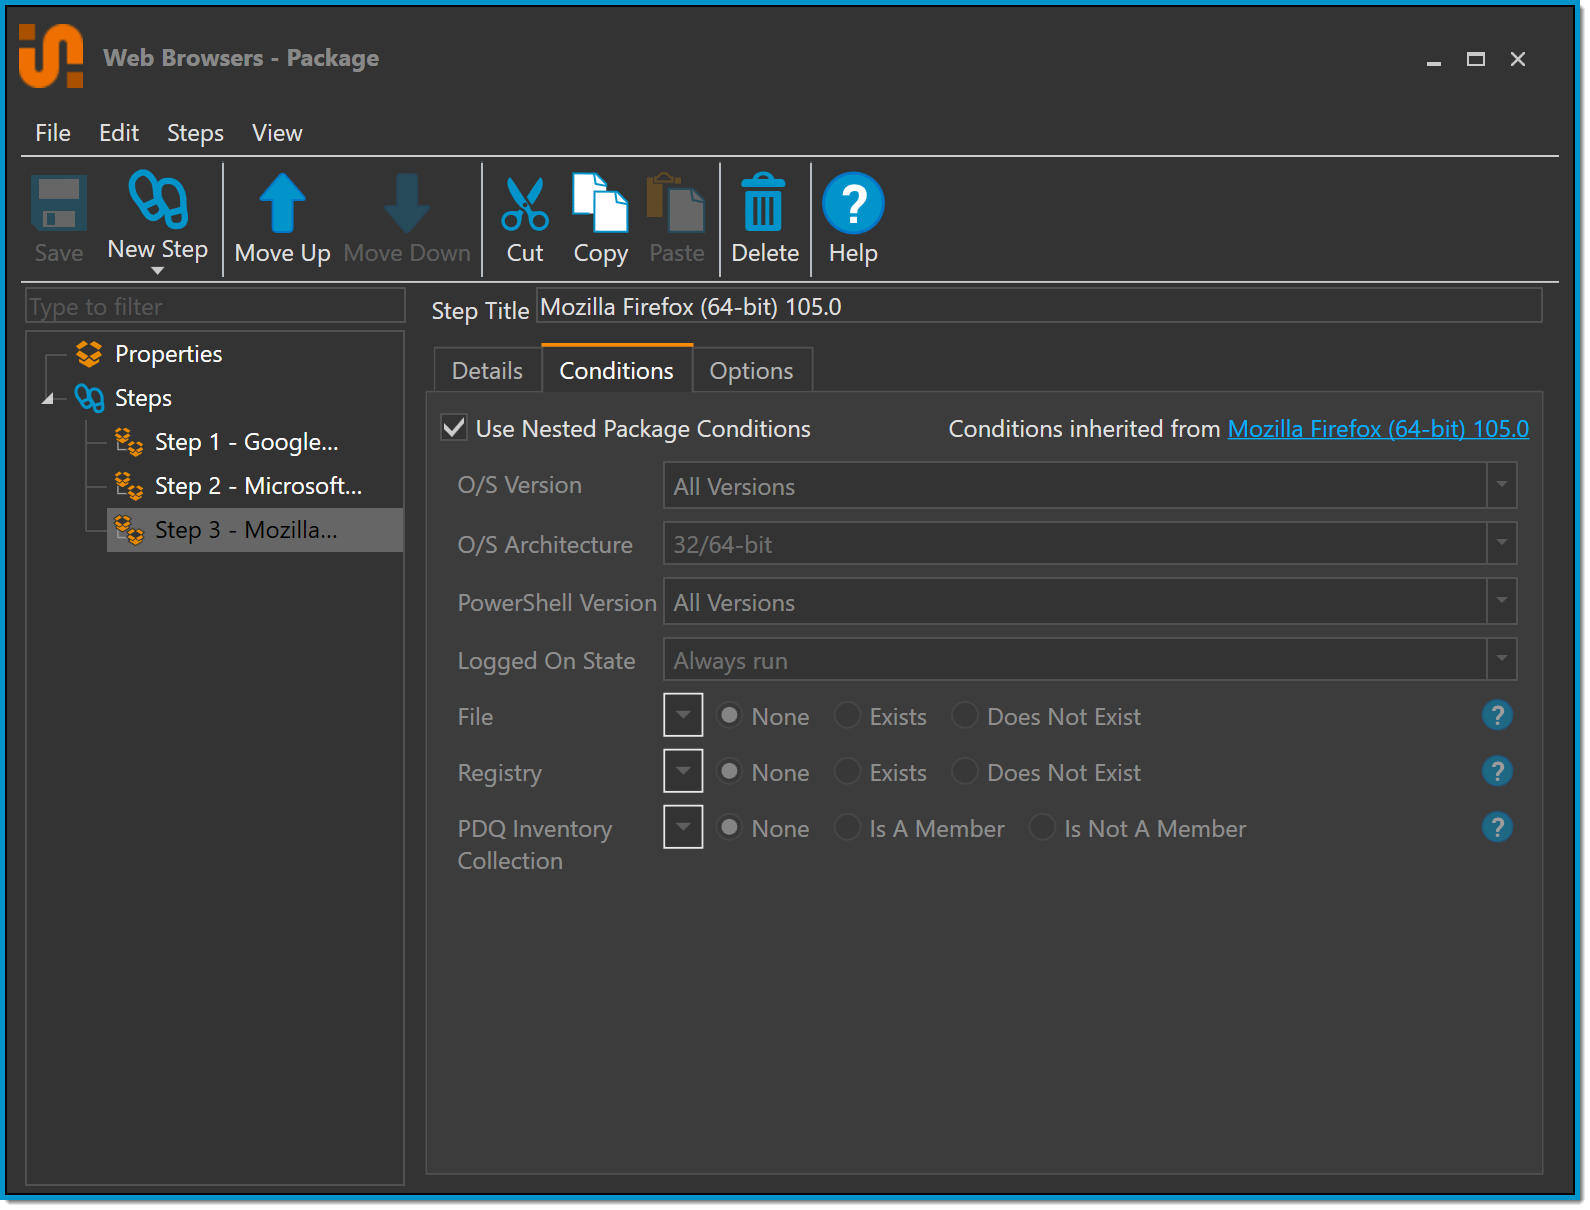
Nested Package Step Properties
- Package - Click Select Package to select a Package to nest. This link is maintained even if the nested package is renamed or moved.
- Step Title - When a package is selected, it populates the Package field and also becomes the Step Title. The package description and the Open package link display below. To see the properties of the nested package, click Open Package.
Note: By default, Nested Package Steps will inherit the Conditions of the package being nested. Uncheck Use Nested Package Conditions in the Nested Package Step Conditions tab to overwrite the conditions for the Nested Package Step.
File Copy Step
A File Copy step copies files and / or folders to target computers.
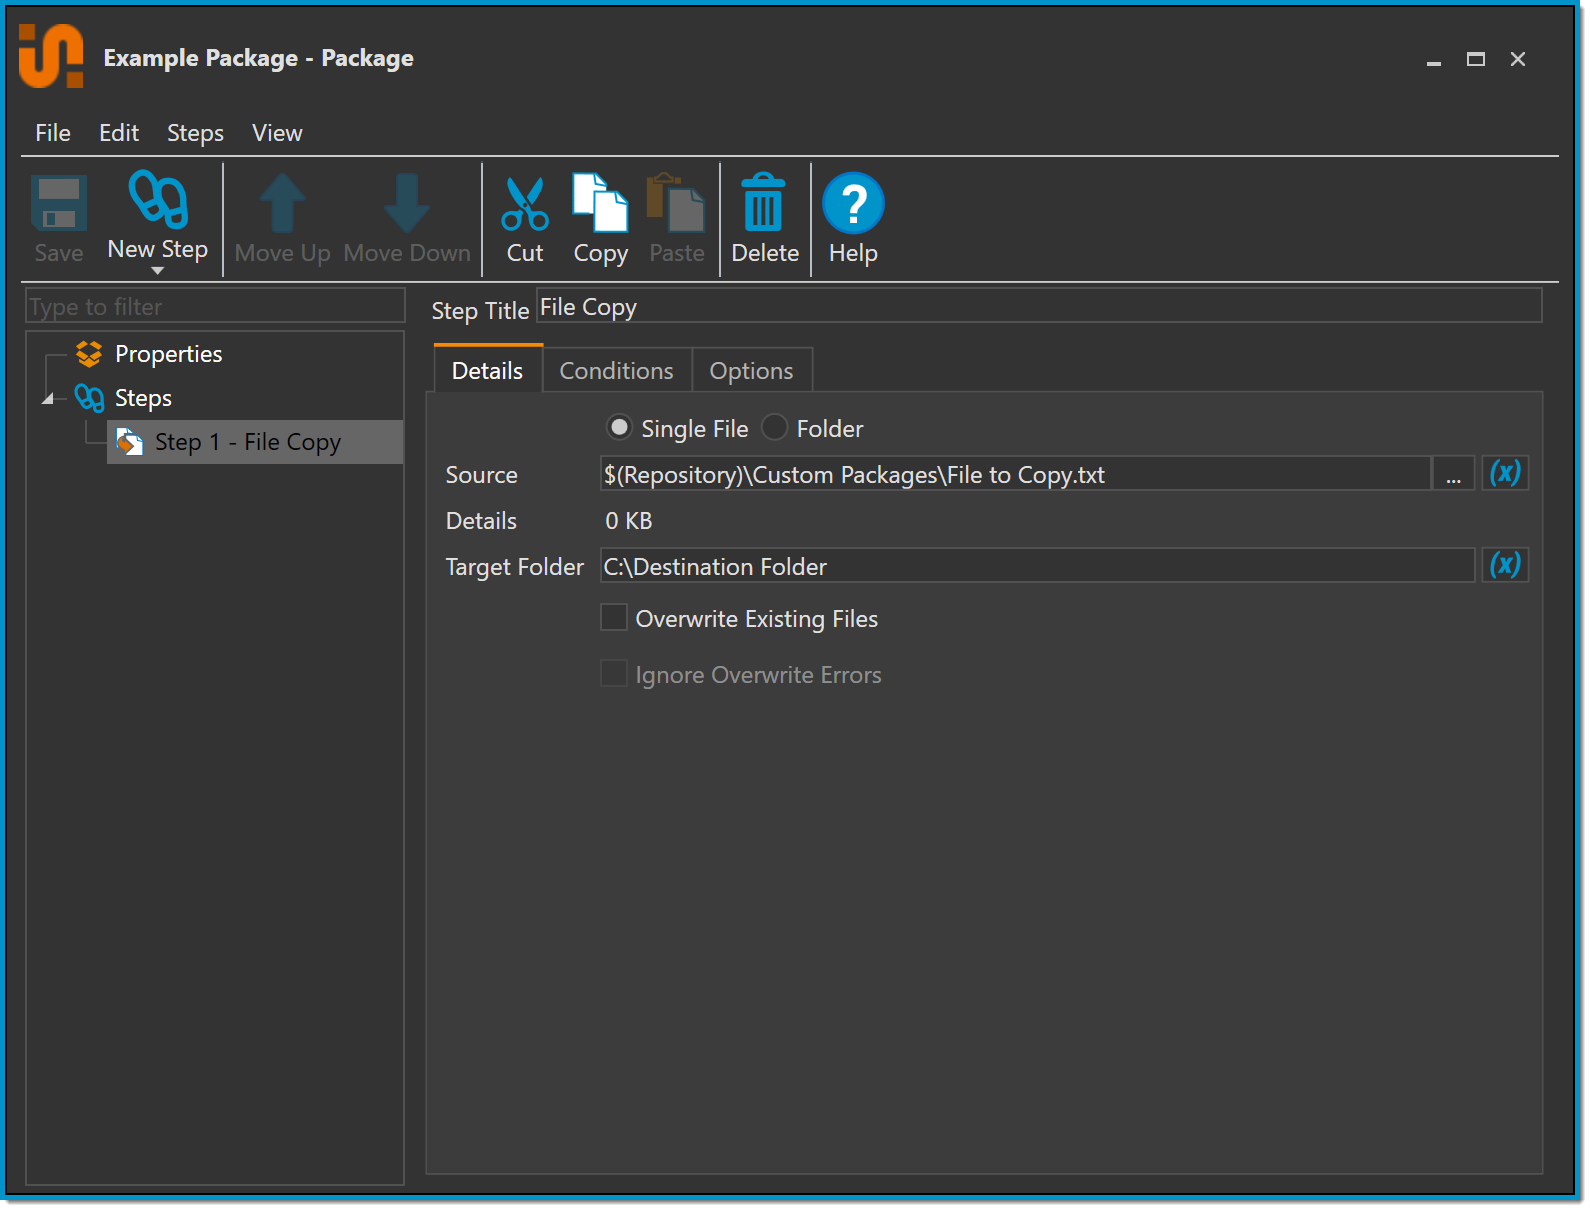
File Copy Step Properties
-
Copy Type - Select whether to copy a single file or a folder.
- Single File: Specifies that only one file is copied.
- Folder: Allows all files in the specified folder to be copied.
-
Source - Select the files/folders you need to copy.
- Note: If Copy Mode is set to Pull, then UNC paths must be used.
- Target Folder - Folder on the target computer where files are copied.
- Overwrite Existing Files - Destination files with the same names are overwritten.
- Ignore Overwrite Errors - Do not stop when overwrite errors occur.
-
Include Subfolders - All subfolders (and their respective files) are copied.
- NOTE: This option only appears when Folder is selected.
-
Copy All Files - When not selected, File Patterns (see below) can be specified to selectively copy desired files.
- NOTE: This option only appears when Folder is selected.
-
File Patterns - Specify which files in a folder to copy (one entry per line).
- Wildcards: * matches all characters and ? matches one character. For example, to match all shortcut files you could use *.lnk or *.url.
- NOTE: This option only appears when Folder is selected.
Scan Step
The Scan Step initiates a PDQ Inventory scan on the target computer.
Note: The scan triggered from a Scan step will have priority over any other current or pending scans in PDQ Inventory and will go to the top of the queue.
Note: Because PDQ Deploy will initiate a post deployment PDQ Inventory Scan, according to your Scan After settings in Options > Preferences > Deployments or in the Package Properties Options tab, this step should only be used if an earlier step causes a change to the target that requires an updated inventory before the next steps in the package can proceed.
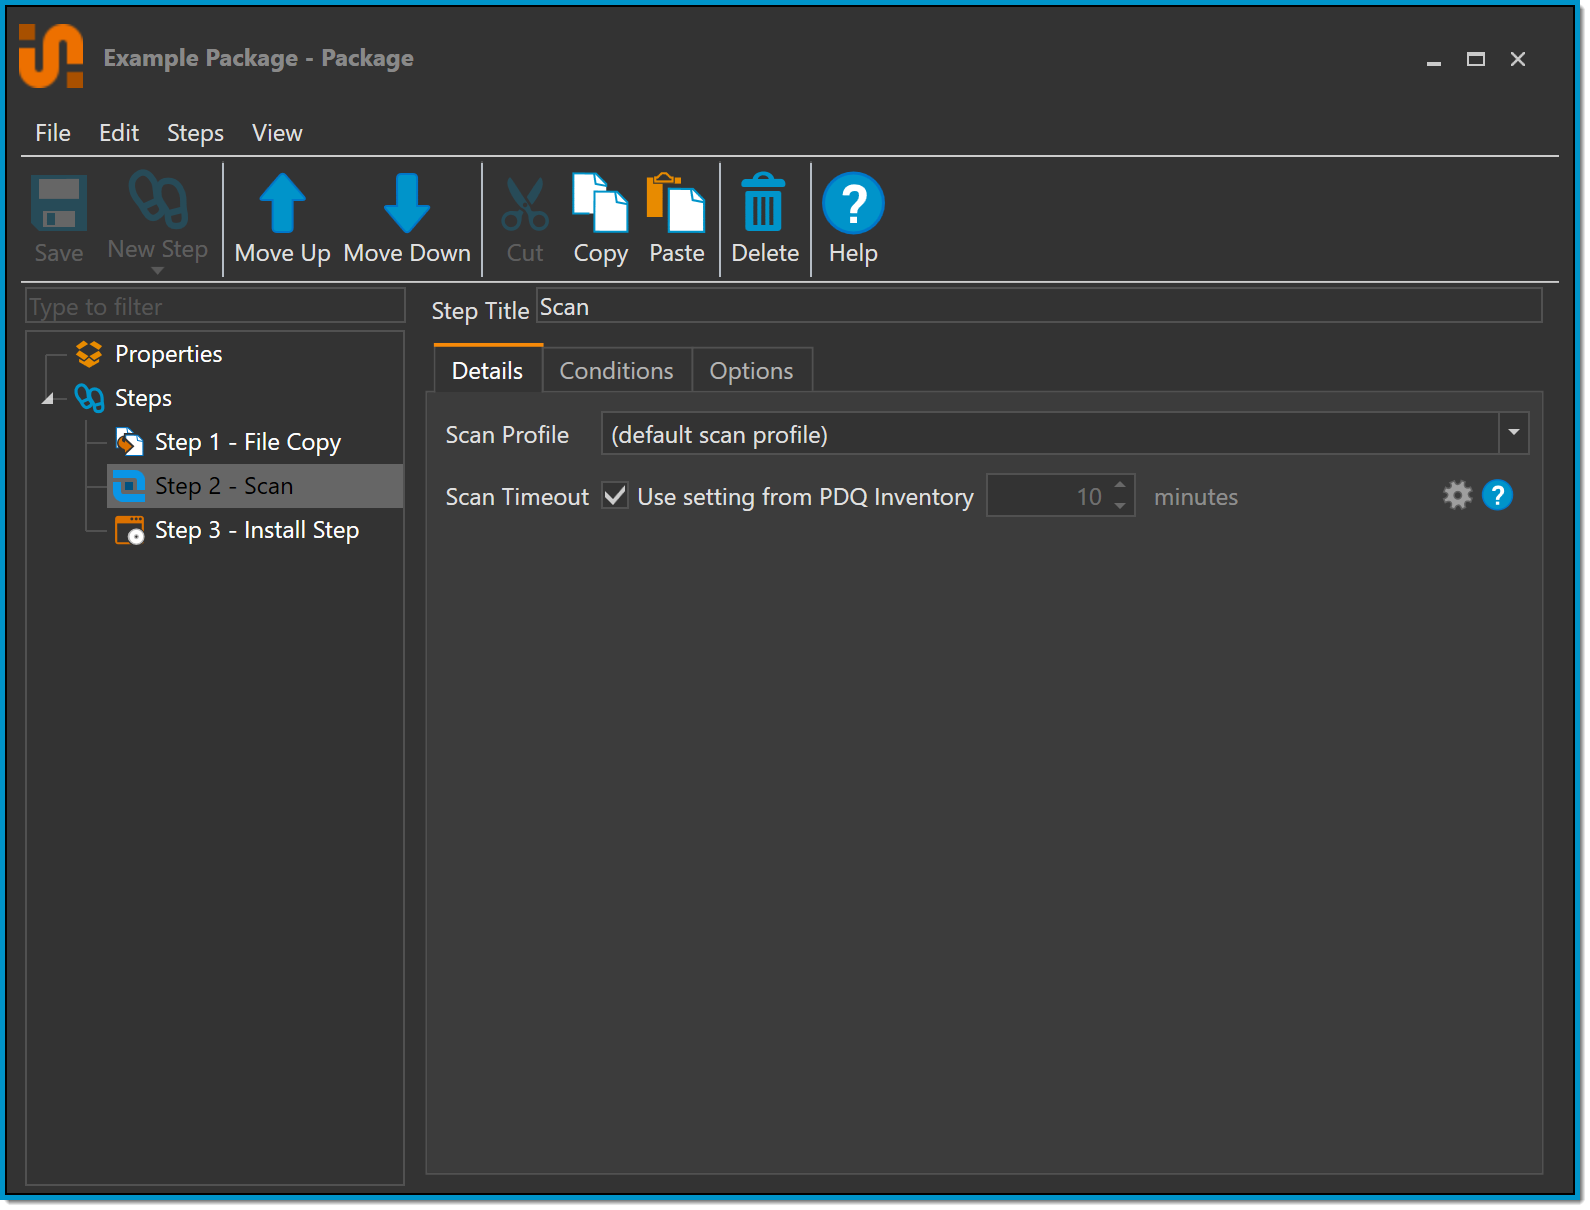
Scan Step Properties
-
Scan Profile - The Scan profile used for the scan. You can choose to scan with any Scan Profile that has been configured in PDQ Inventory. The default Scan Profile is defined in PDQ Inventory in Preferences > Scan Profiles. It is common to use either the Applications or Standard scan profiles.
- Note: If the Scan Profile has been deleted from PDQ Inventory, the scan will fail. It will not revert to another scan profile by default.
- Scan Timeout - Specifies how many minutes PDQ Deploy will wait for the scan to run before being timed out by the server. You can use the default setting from PDQ Inventory or overwrite it with a custom value.
Reboot Step
The Reboot Step initiates a reboot on the target computer, and waits for it to come back online before continuing the deployment.

Reboot Step Properties
- Seconds before reboot - Number of seconds to wait before rebooting the target computer. Any logged on users are notified that a shutdown is in progress if any Message text is provided.
- Message - Optional message to show users during the reboot timeout above. Note, not all versions of Windows show this message to users, but it is logged to the event log.
- Shutdown Only - Shuts down the target computer and doesn't restart it. If this option is used and it's not the last step, then any following steps time out unless the target computer is restarted via other means.
Sleep Step
The Sleep Step pauses the deployment for a set amount of time.
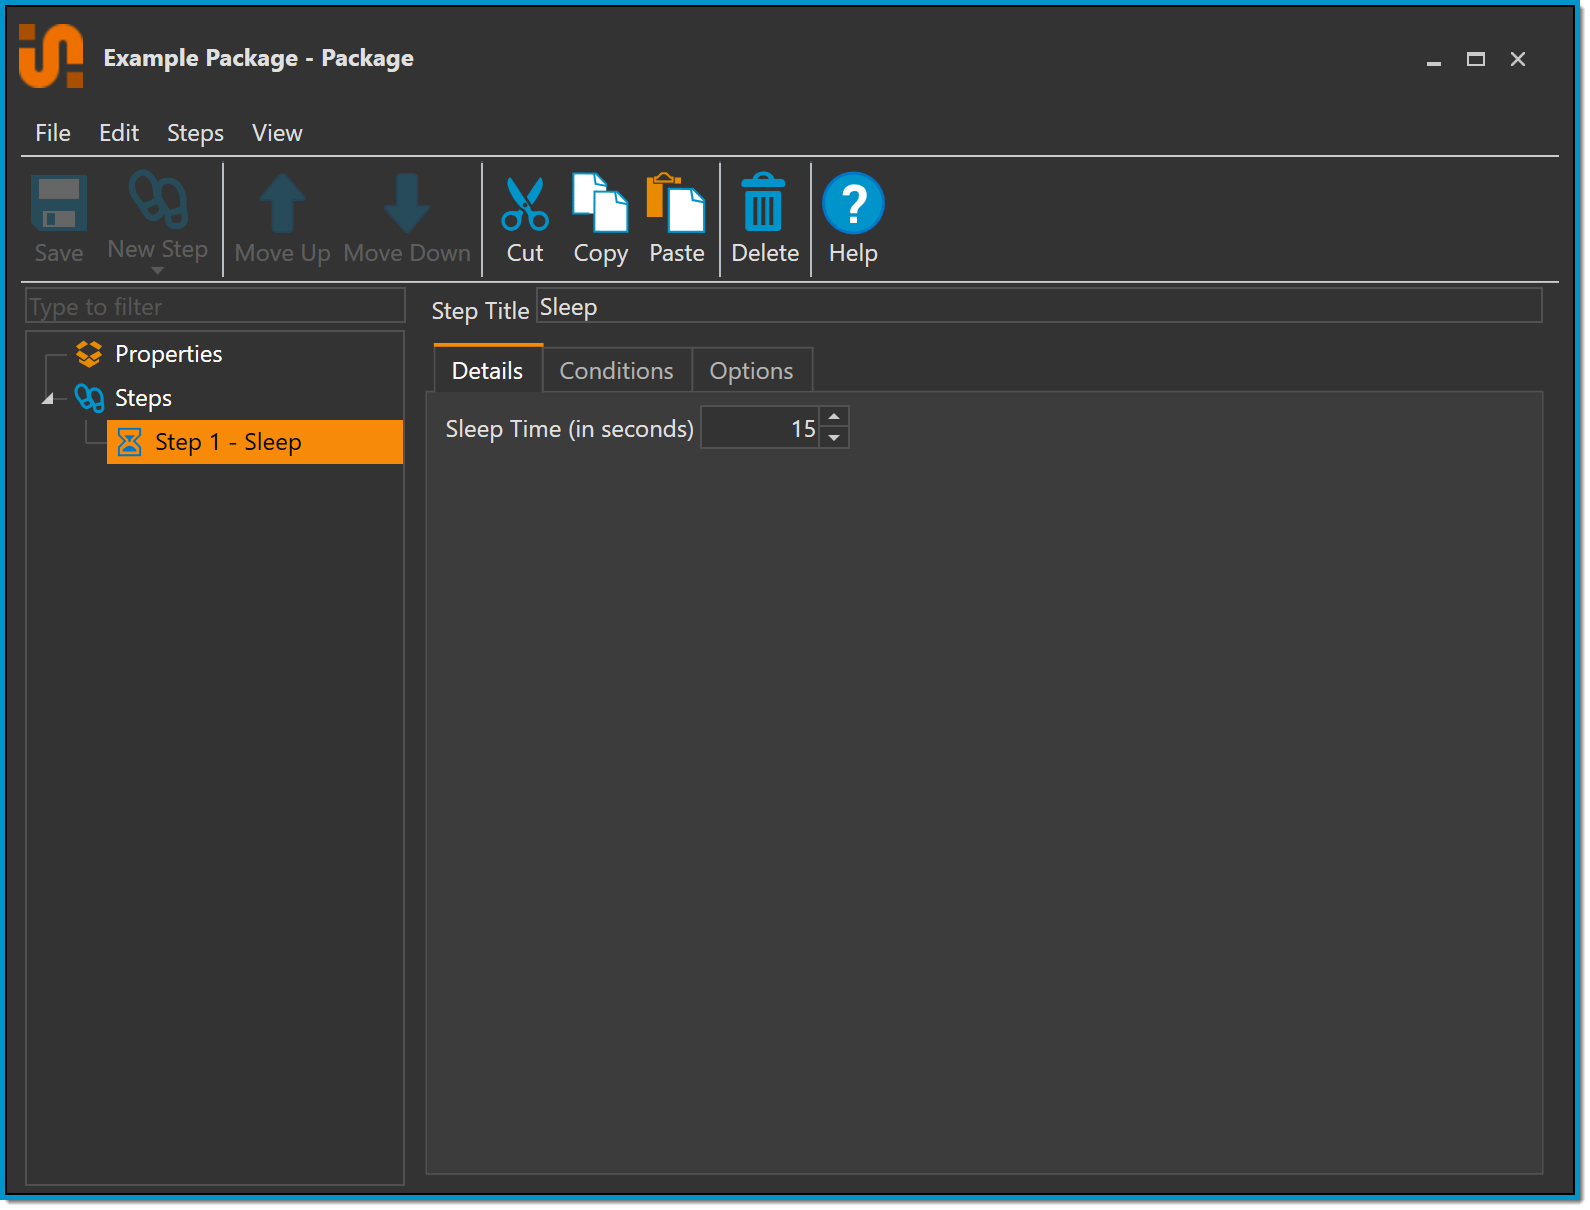
Sleep Step Properties
- Sleep Time (in seconds) - Select the number of seconds to sleep. The minimum is 1 second.
Message Step
Use a Message step to display a message on target computers. This feature can be useful when you want to warn users of a new installation, to let them know when an installation is finished, or to remind them to reboot their computers before they leave for the day. This step is primarily provided as a heads-up to your users.
The message is displayed using the %WINDIR%\system32\msg.exe utility. Msg.exe is a Microsoft Windows utility that is available on all versions of Windows (XP or later). This utility doesn't provide a way for the user to delay or cancel a package deployment.
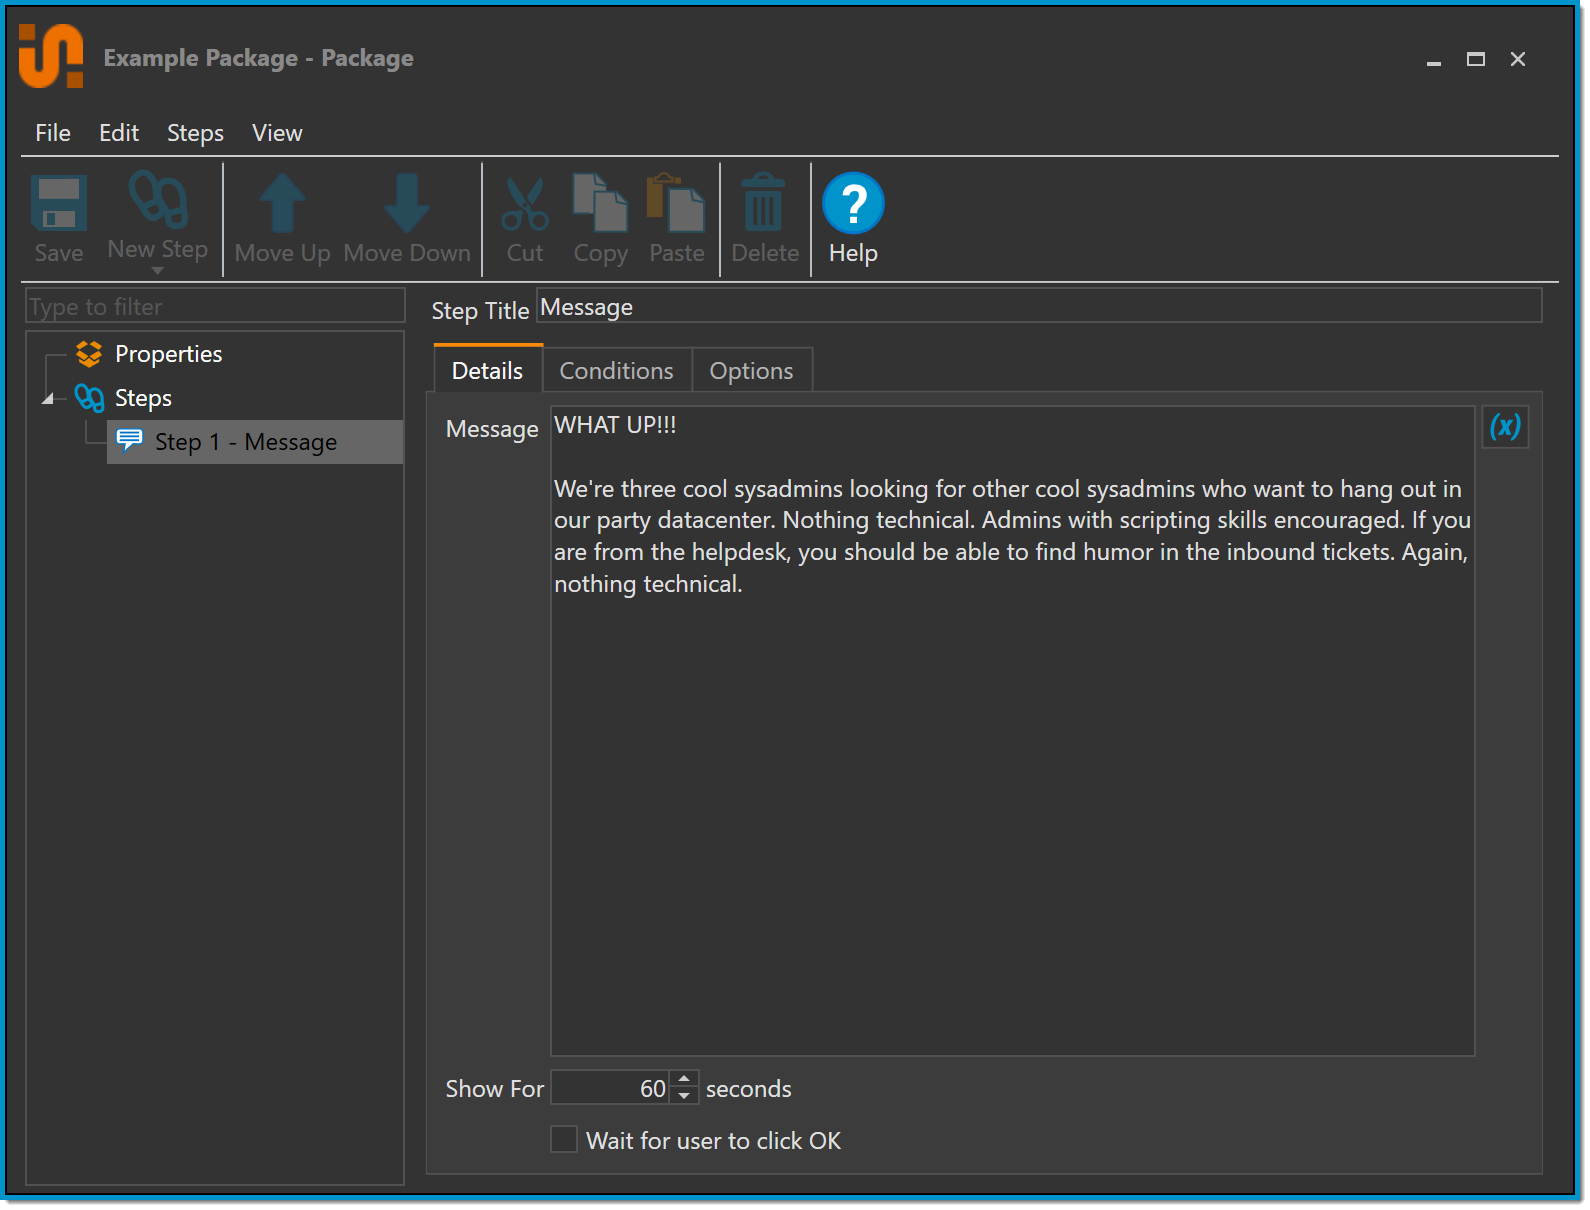
Message Step Properties
- Message - Type the message you want displayed in the Message window on the Details tab.
- Show For - Enter in the time (in seconds) you want the message to display.
-
Wait for user to click OK - Use this option if you want the message to wait to be acknowledged before proceeding. The message will disappear after the user clicks OK or the timer in the Show For property runs out, whichever occurs first.
- If the message is not acknowledged within the set time frame, the Message window closes and the deployment executes the next step in the Package.
- Note: When a user closes the Message window, the next step in the Package begins. This is important to remember because, for example, if the next step kills a process such as firefox.exe and the user closes the Message window before closing Firefox, then Firefox is simply killed before they can act on it. To prevent this problem, clear the Wait for user to click OK option and add a Sleep step after the Message step. Then, if the user closes the Message window before closing Firefox, the next step still waits for xx seconds before moving on to the Kill Firefox step.
Logoff Step
The Logoff Step forces current interactive logon sessions to logoff the target computers.
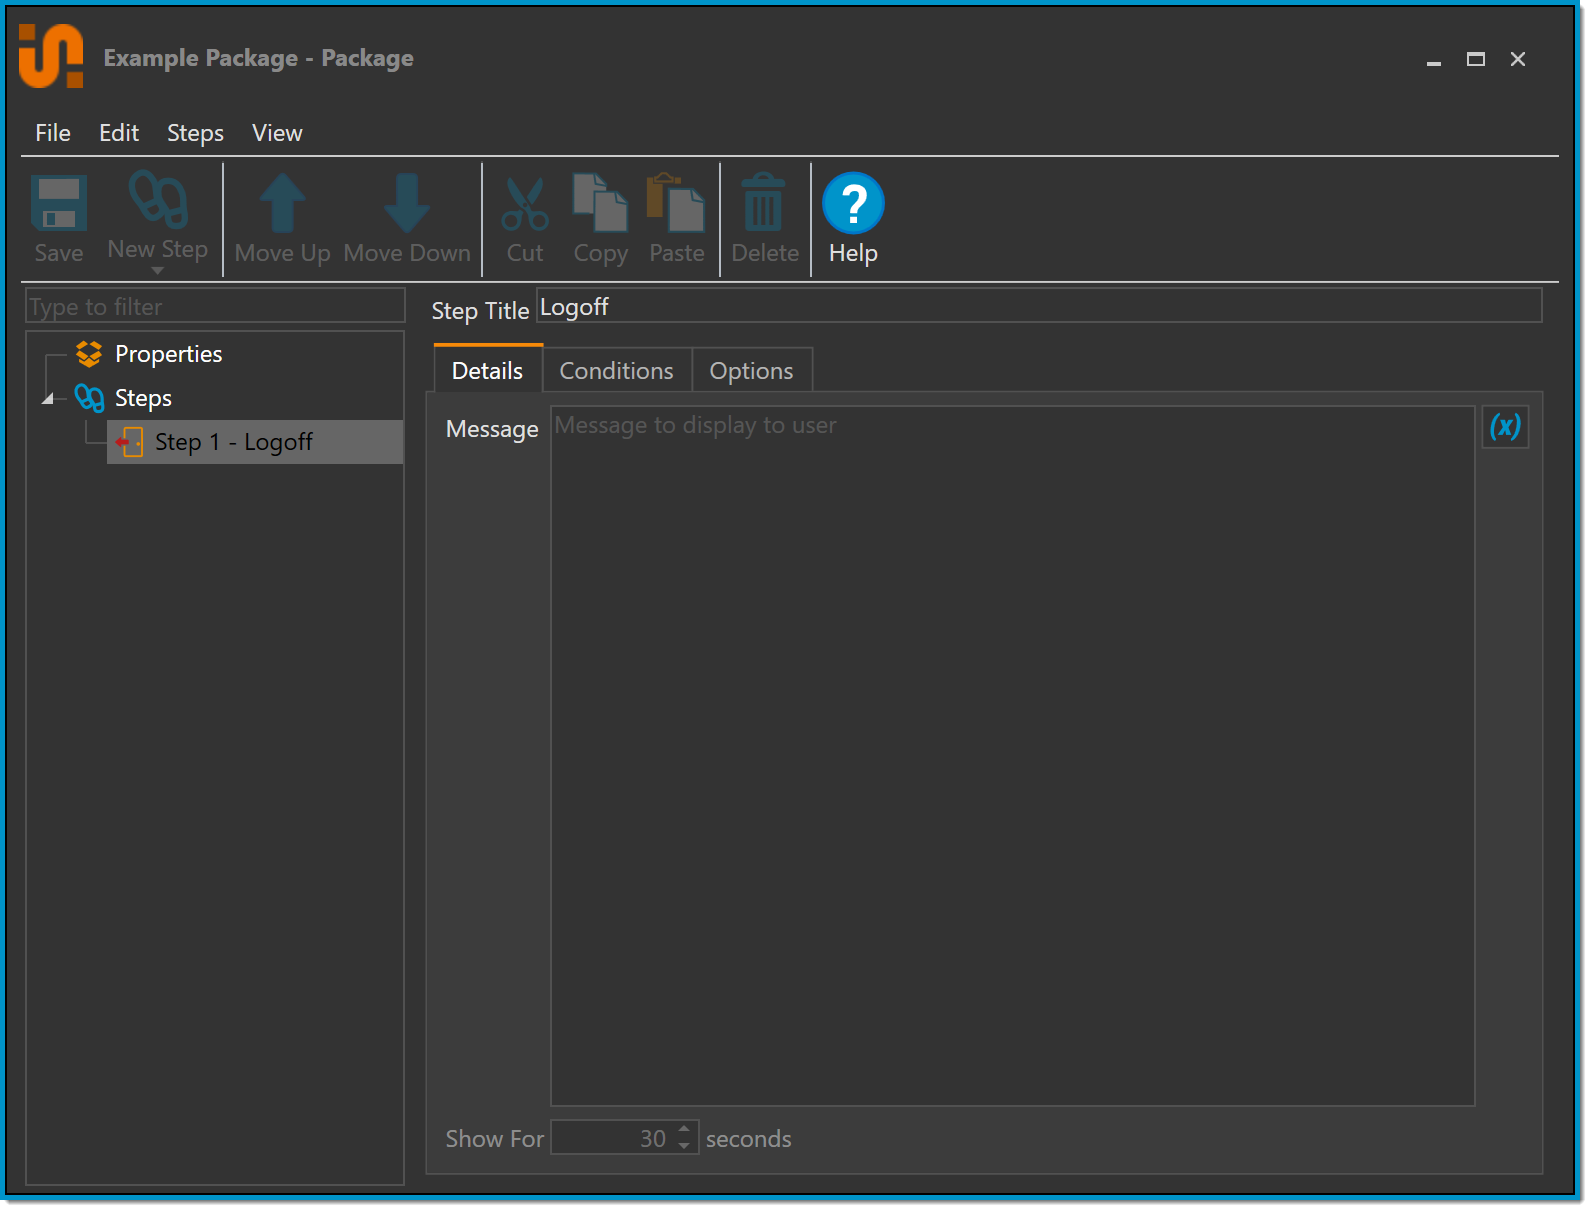
- Message - Type in the message you want to display in the Message window on the Details tab. If no Message is entered, then the Show For timer is grayed out and the log off takes place immediately.
- Show For -Enter the time (in seconds) you want the message to display. This timer value is still honored if the user closes the message window.
See Also: