
Creating Scan Profiles
Purpose:
You need to create custom Scan Profiles to scan your computers for data not scanned for in the pre-built Scan Profiles.
Resolution:
Scan Profiles consist of one or more scanners, and are used to scan for specific information on the Windows computers across your network. Individual Scan Profiles can be created to scan for specific limited information such as, installed applications, installed hotfixes, or basic computer details. Scan Profiles can also be configured to scan for certain Files & Directories as well as the Registry. For those comfortable with scripting, the PowerShell scanner can execute custom PowerShell scripts to return data that is not scanned for in the pre-built scanners. For those uncomfortable with scripting, our PowerShell Scanners Repository on our GitHub page contains many pre-built custom PowerShell Scanners.
PDQ PowerShell Scanner Repository - GitHub
Contents:
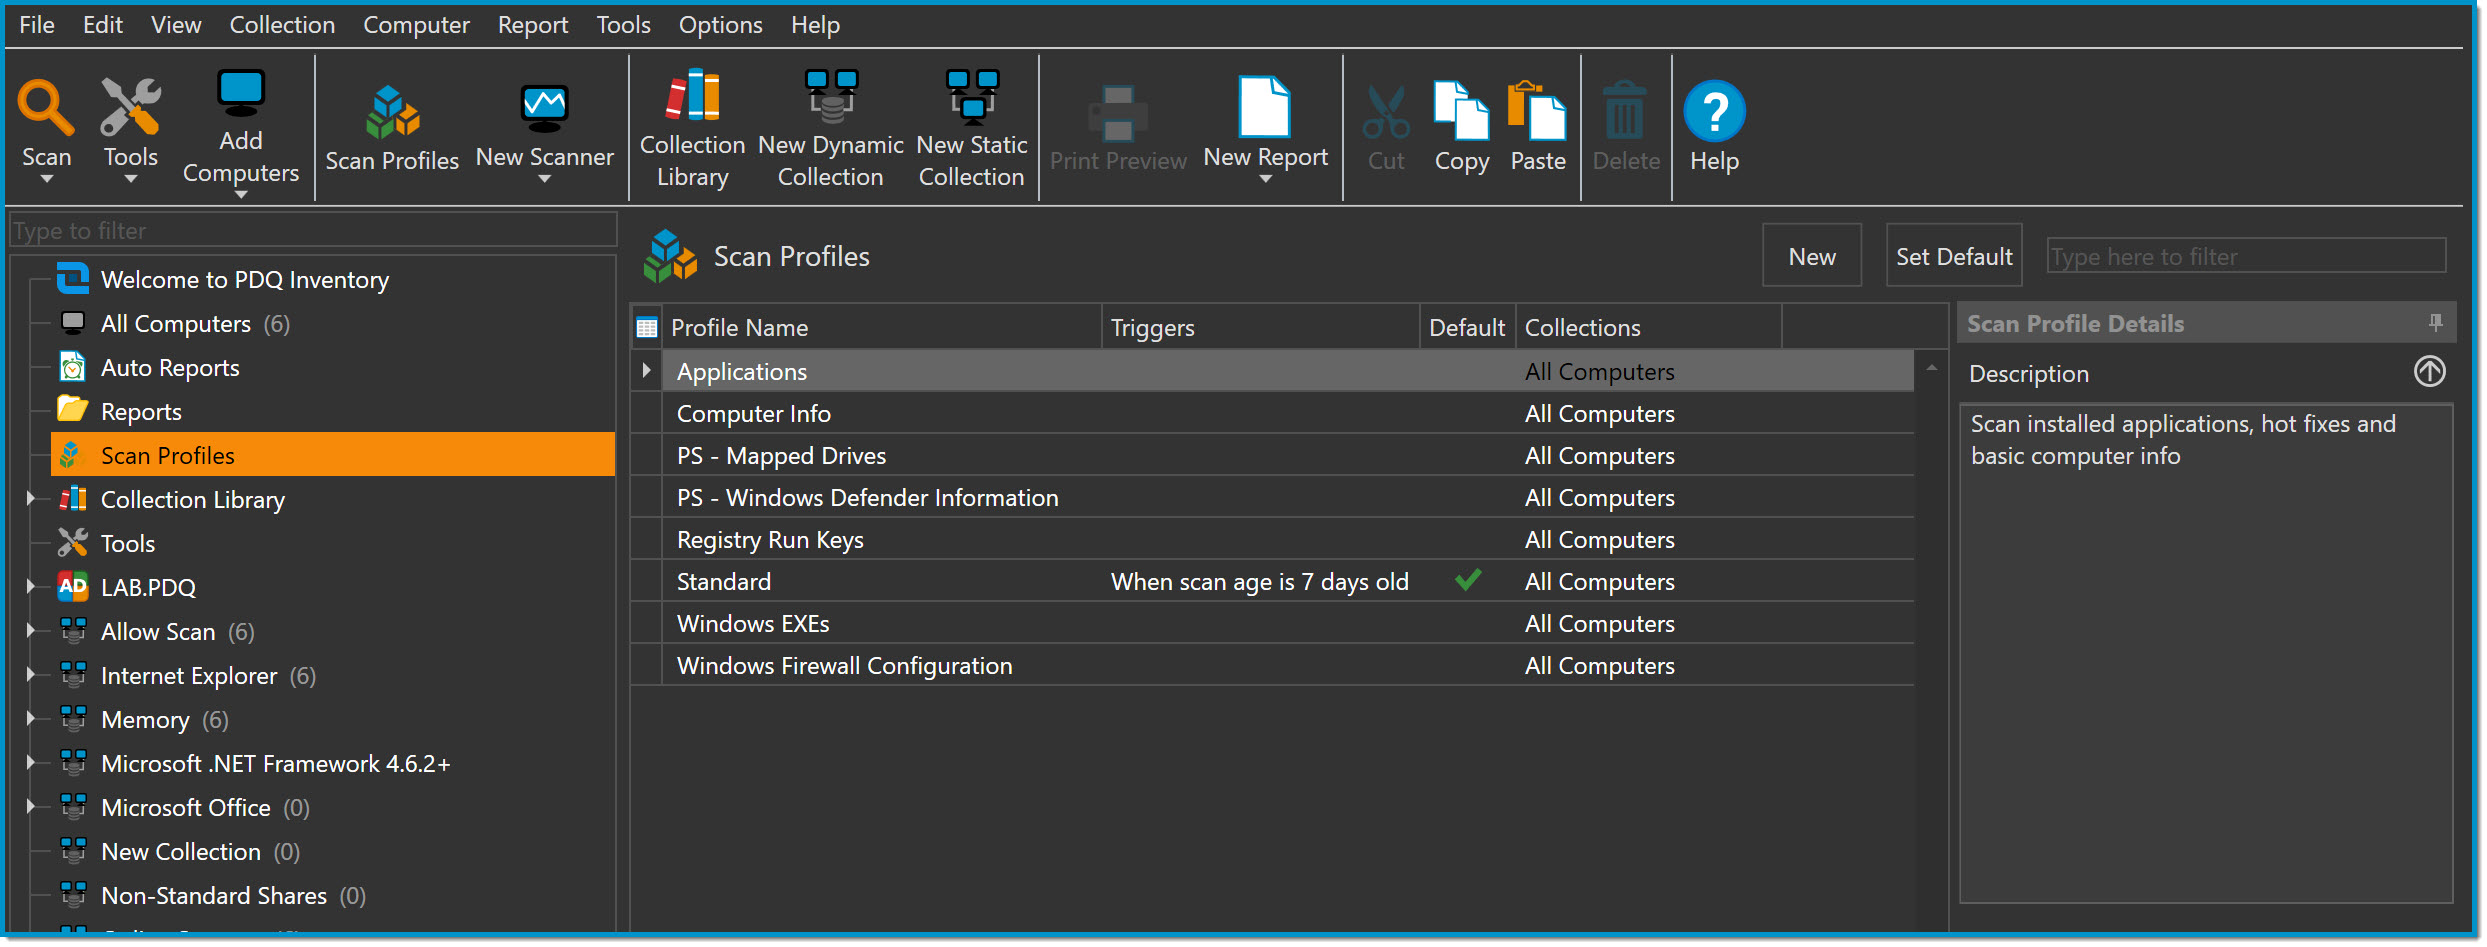
New Scan Profile
New Scan Profiles can be created by selecting New on the Scan Profiles page. To get to the Scan Profiles page, click Scan Profiles in the tree, click Scan Profiles in the toolbar, or select Computer > Scan Profiles from the menu.
Details Tab
The Details tab of a Scan Profile is where the Scan Profile is named, the Scan User configured, and the Scanners to be used are selected.
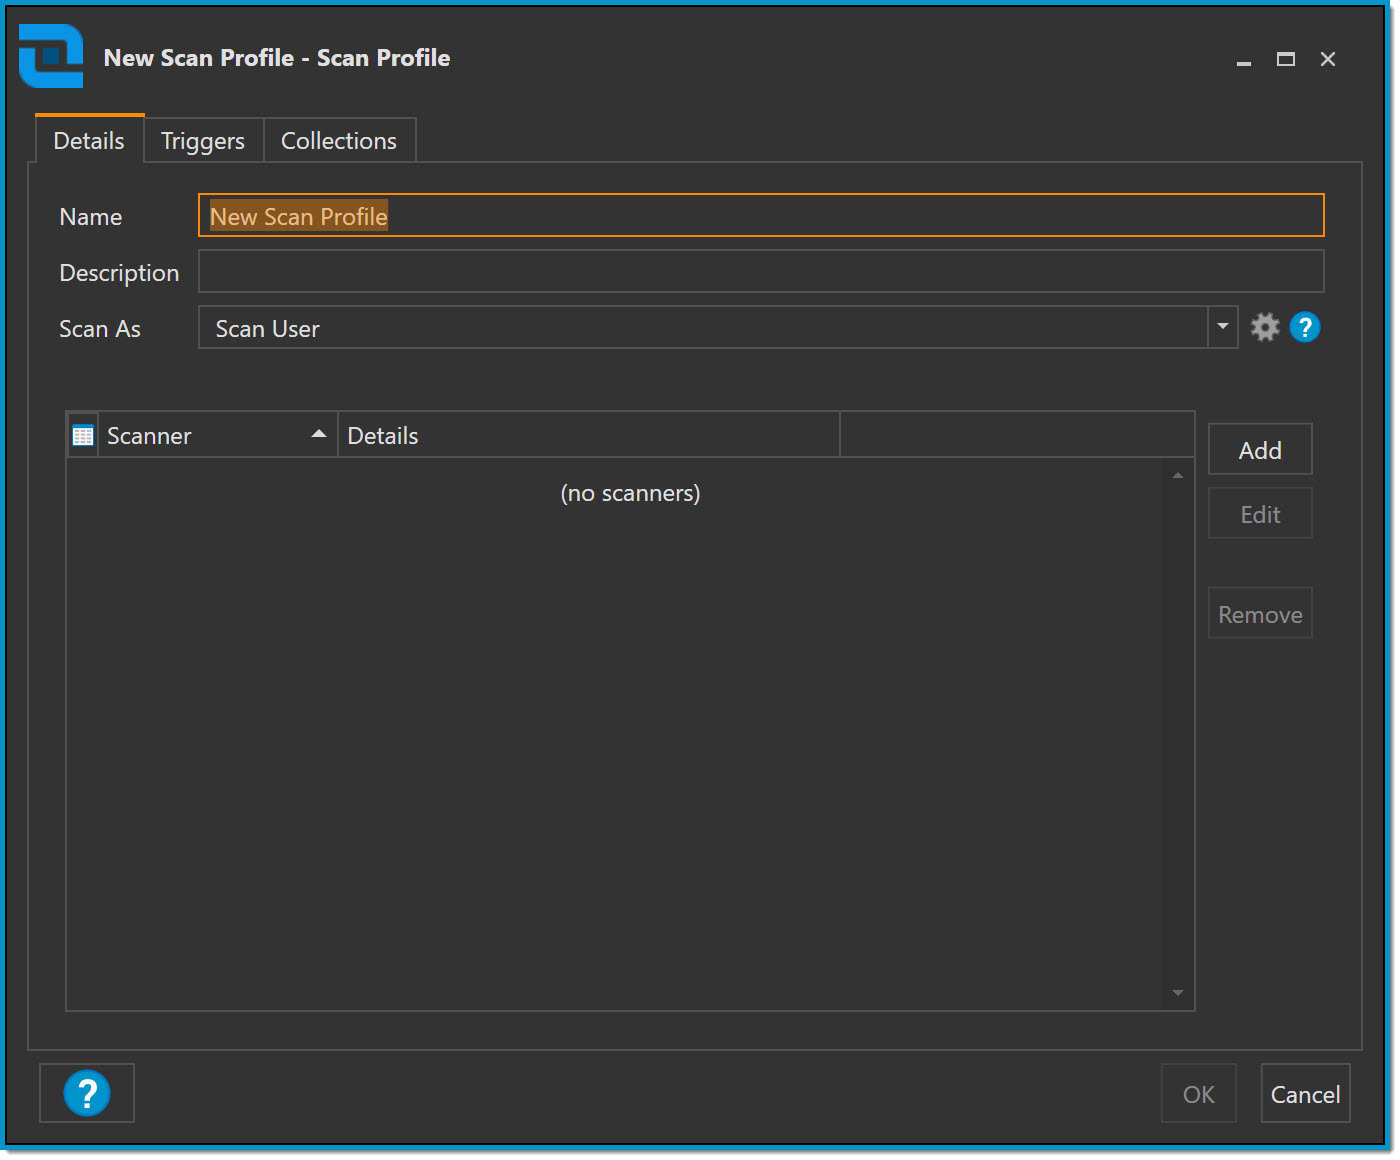
The Details tab contains the following options:
- Name - The name of the Scan Profile.
- Description - (Optional) A description of the Scan Profile.
- Scan User - The Scan User account that will be used to scan the target computers with the scanners in the configured Scan Profile.
- The default Scan User will be initially selected here. Selecting a different Scan User for a specific Scan Profile will override the global default Scan User.
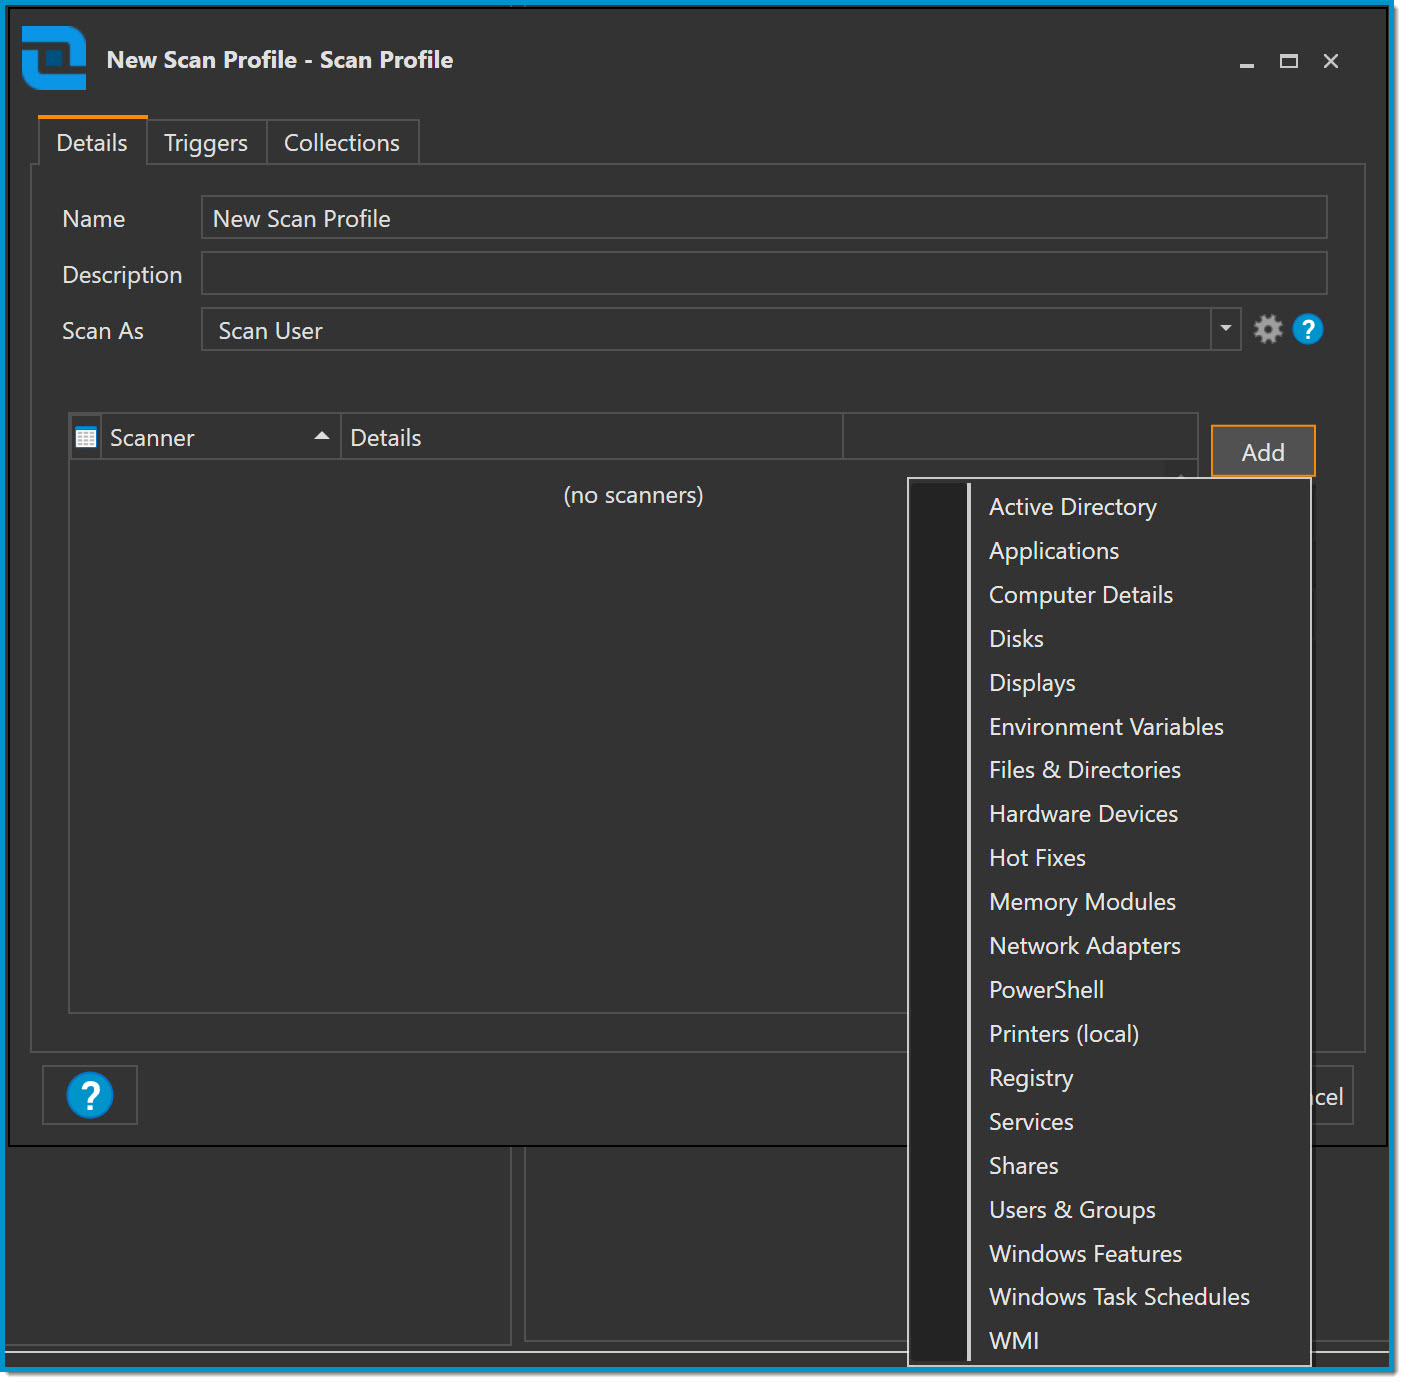
The empty space below the Scan User field is where the attached Scanners are listed. To add a scanner to a Scan Profile, select Add and choose a scanner from the list. Multiple scanners can be added to a single Scan Profile. Information about the different Scanners can be found in the Types of Scanners section of this article.
Note: Don't forget to name your Scan Profile. Leaving a Scan Profile un-named will default to the name New Scan Profile, and will not increment when Scan Profiles are saved with the same name.
Triggers Tab
The Triggers tab of a Scan Profile allows you to schedule your scans. Leaving the Triggers tab blank will result in the Scan Profile only running when manually initiated.
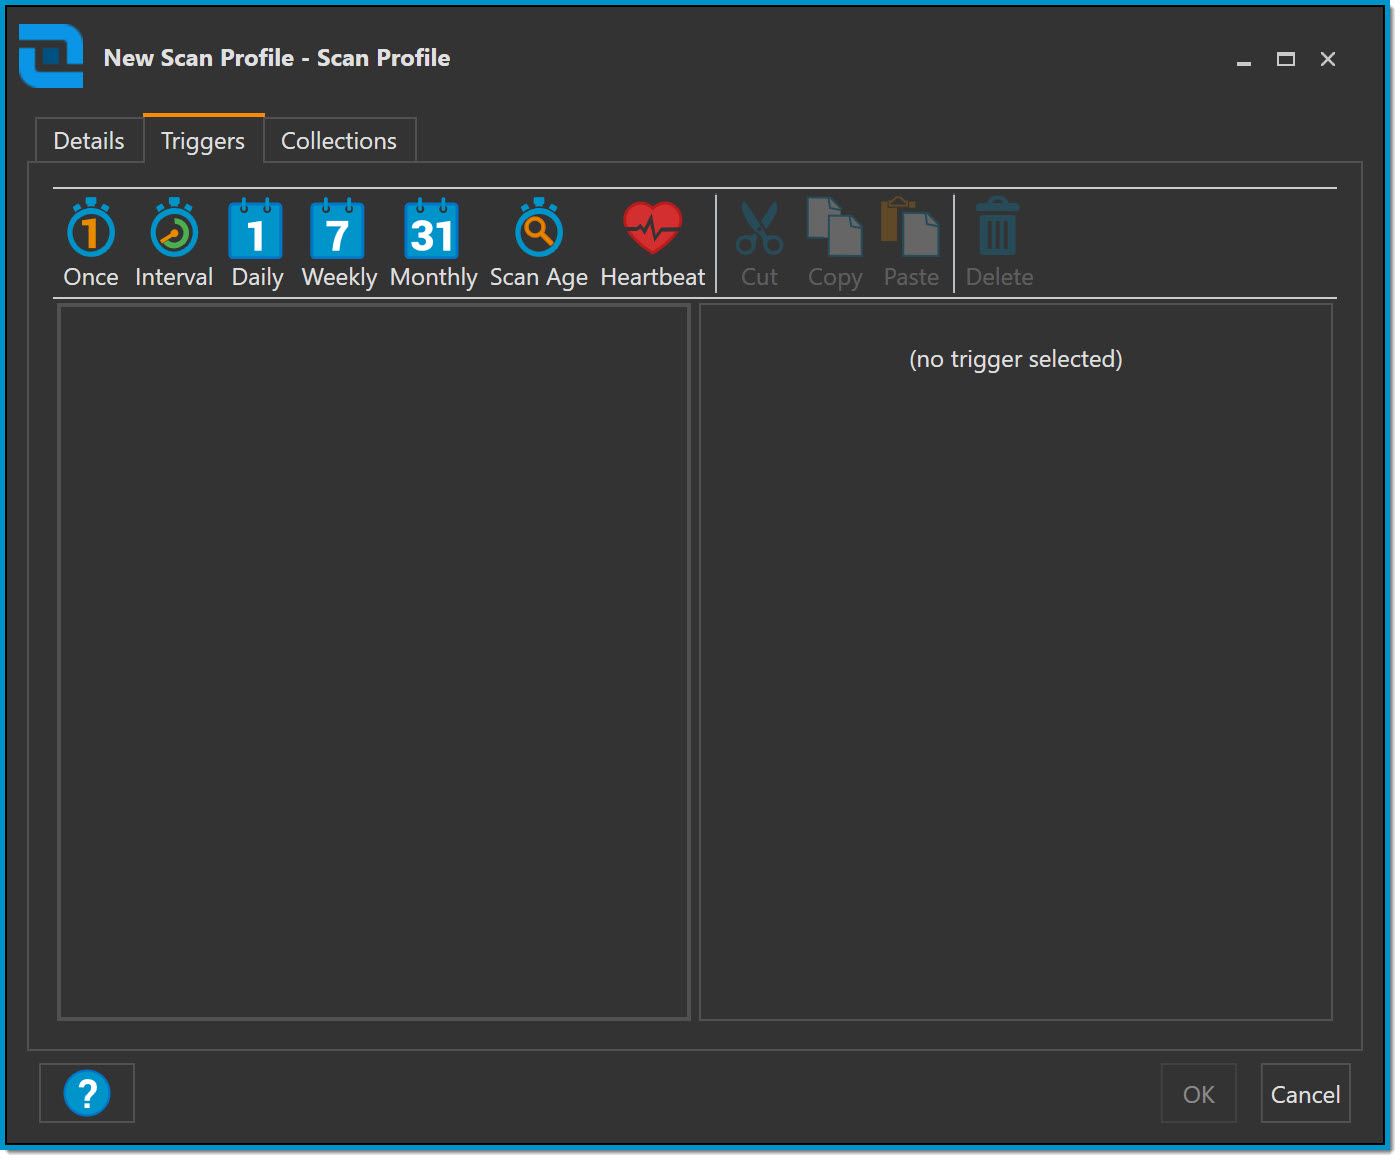
Scan Profiles contains the following triggers:
Once - The Scan Profile will automatically run once, at the configured date & time
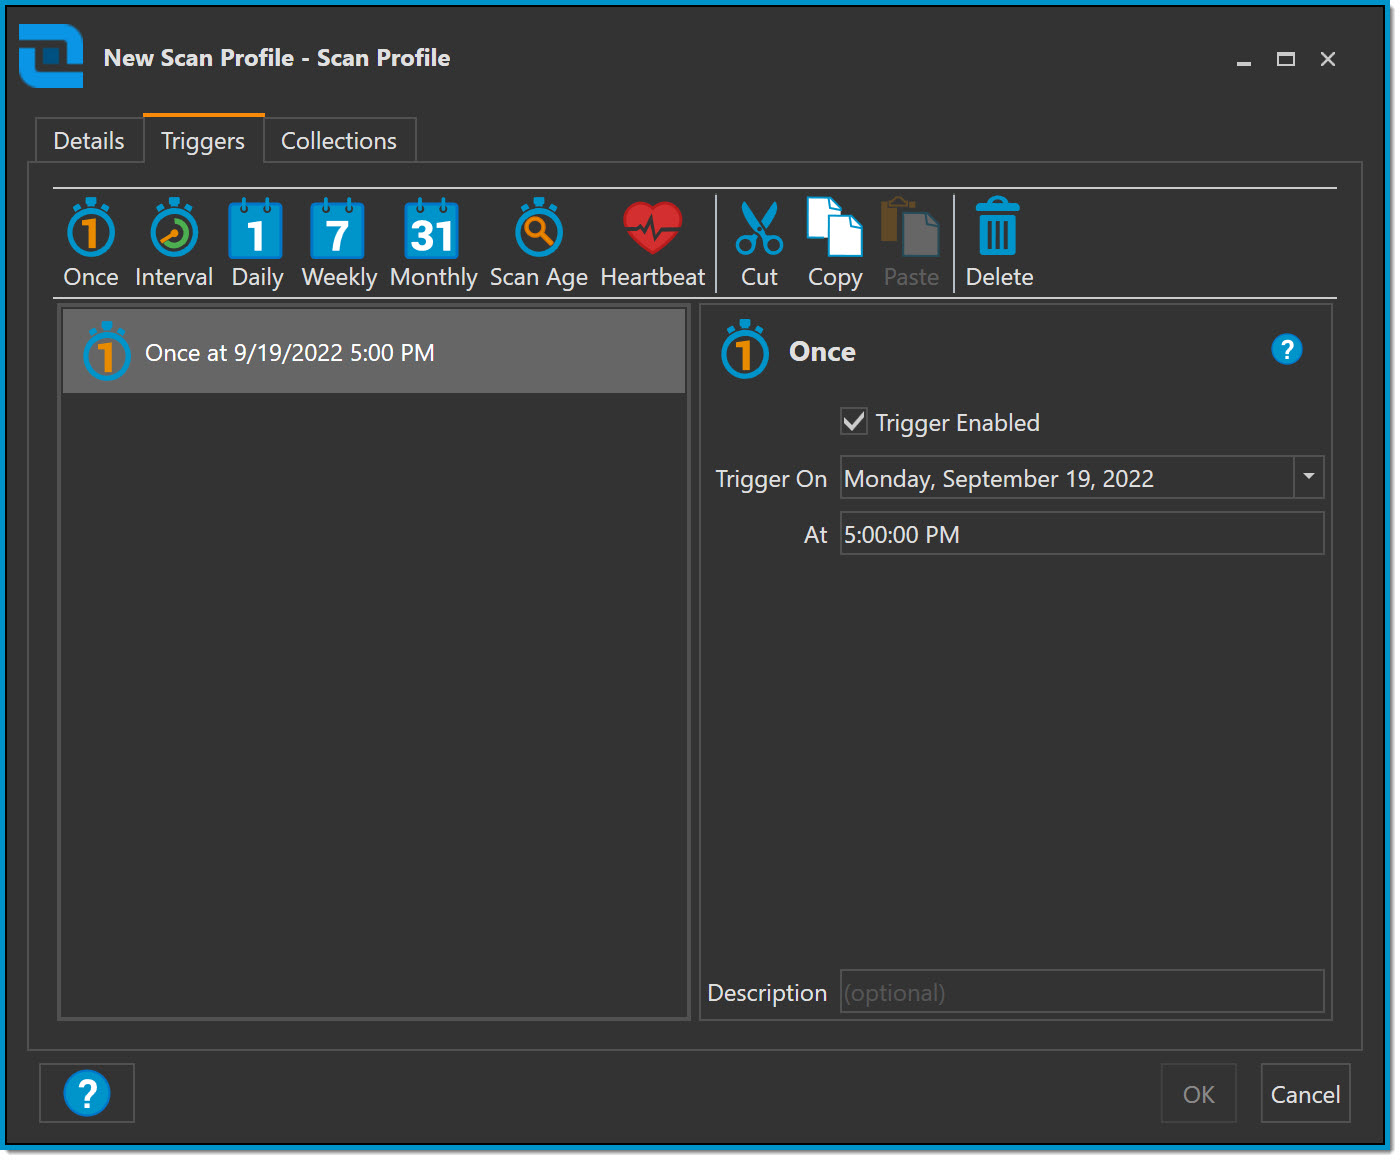
The Once trigger contains the following options:
- Trigger On - Set the date & time for the Scan Profile to run once
Interval - The Scan Profile will automatically run according to the configured interval
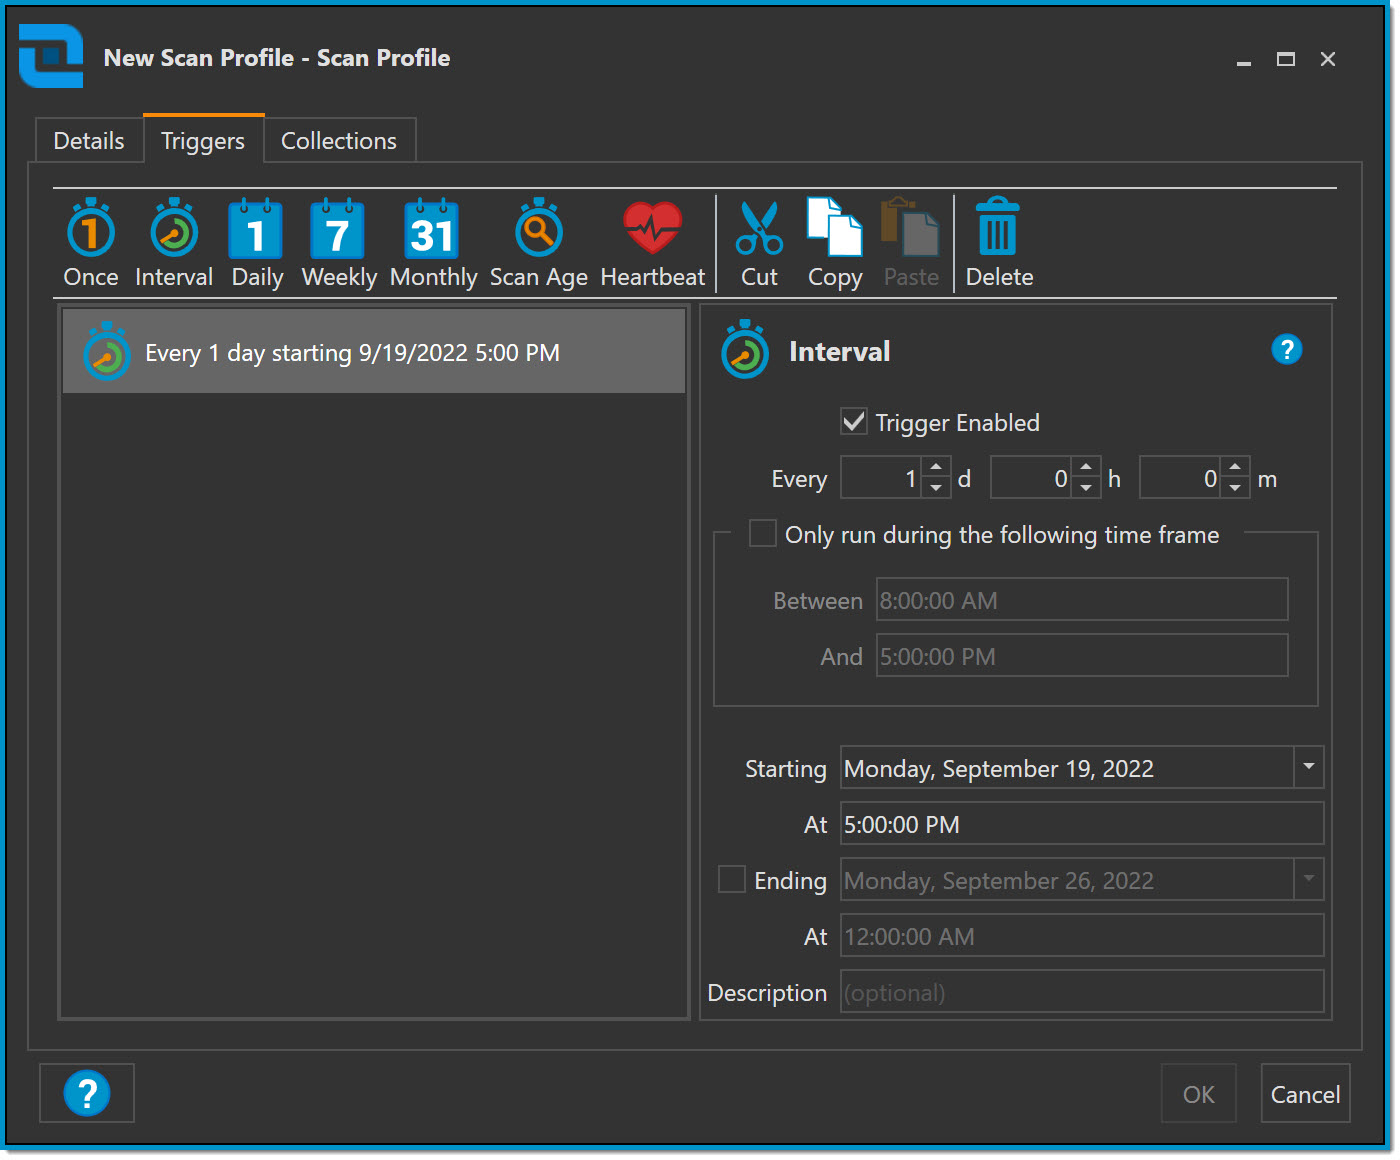
The Interval trigger contains the following options:
- Every d/h/m - Configure the day/hour/minute intervals that you wish for the Scan Profile to run
- Only run during the following time frame - When checked, the Scan Profile will run during the time set here
- Starting / Ending dates & times - Configure the Starting & optional Ending times for the Scan Profile
- The Starting date & time is the first time the Scan Profile will run
- When the optional Ending date & time is checked, the Scan Profile will stop running once the configured date & time has passed
Daily - The Scan Profile will run every day at the configured time
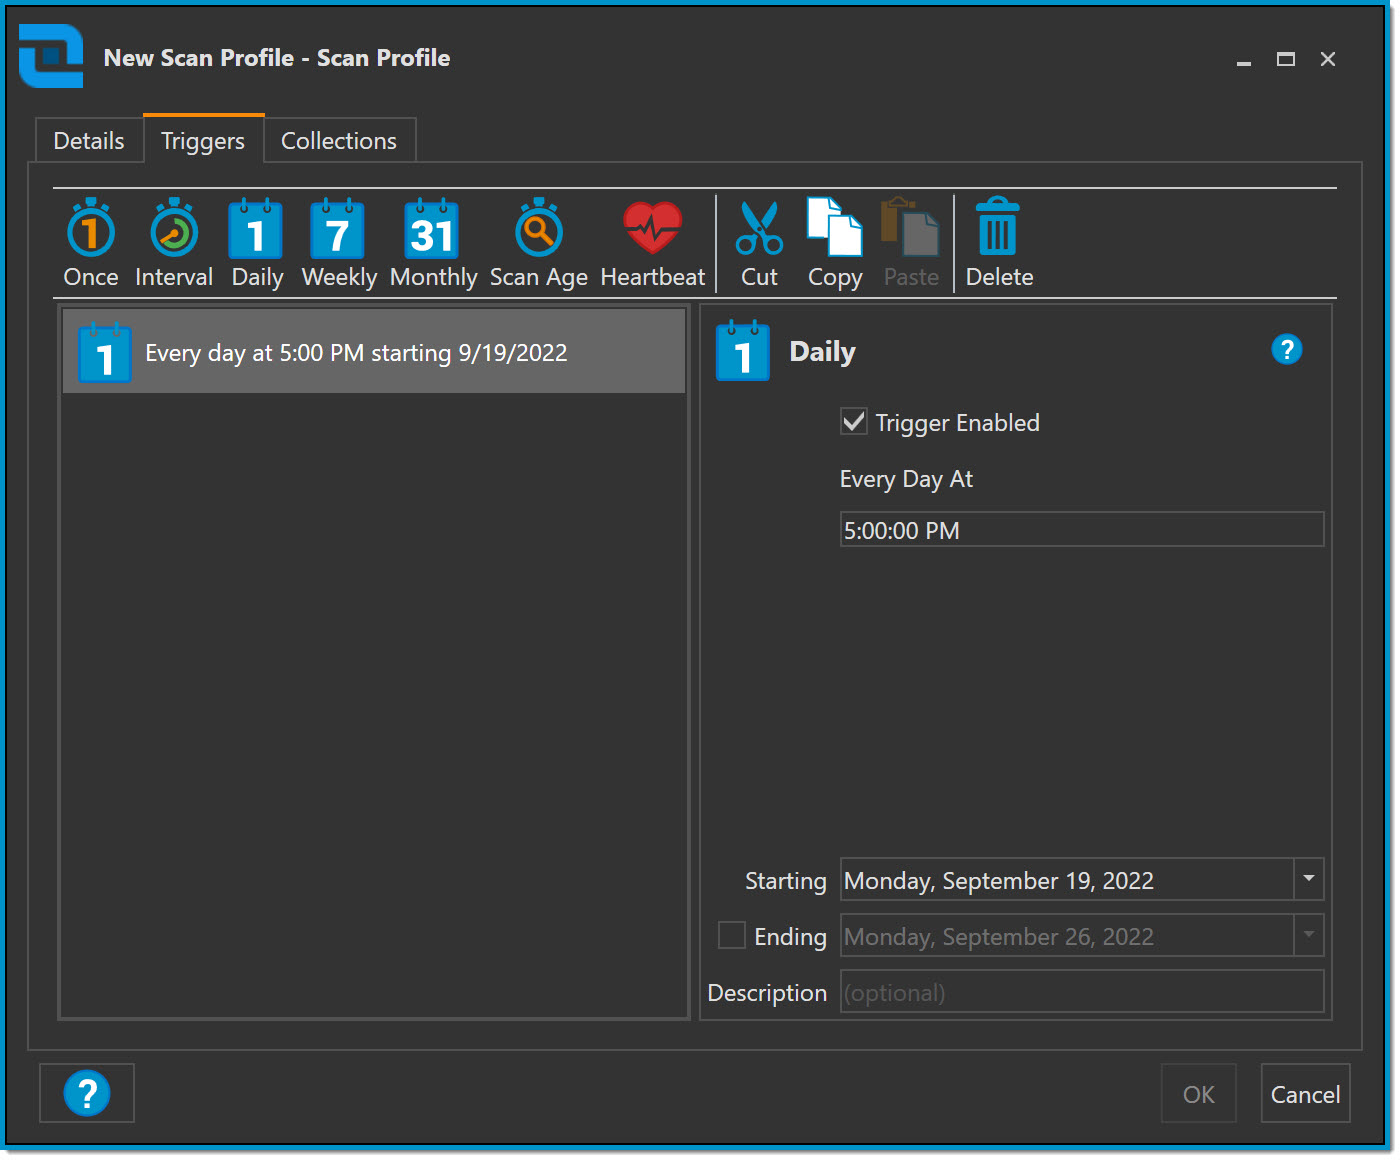
The Daily trigger contains the following options:
- Every Day At - Configure the time that the Scan Profile should run every day
- Starting / Ending dates - Configure the Starting and optional Ending dates for the Scan Profile
- The Starting date is the first date the Scan Profile will run
- The Ending date (Optional) is the last date the Scan Profile will run
Weekly - The Scan Profile will run every week on the configured days and times
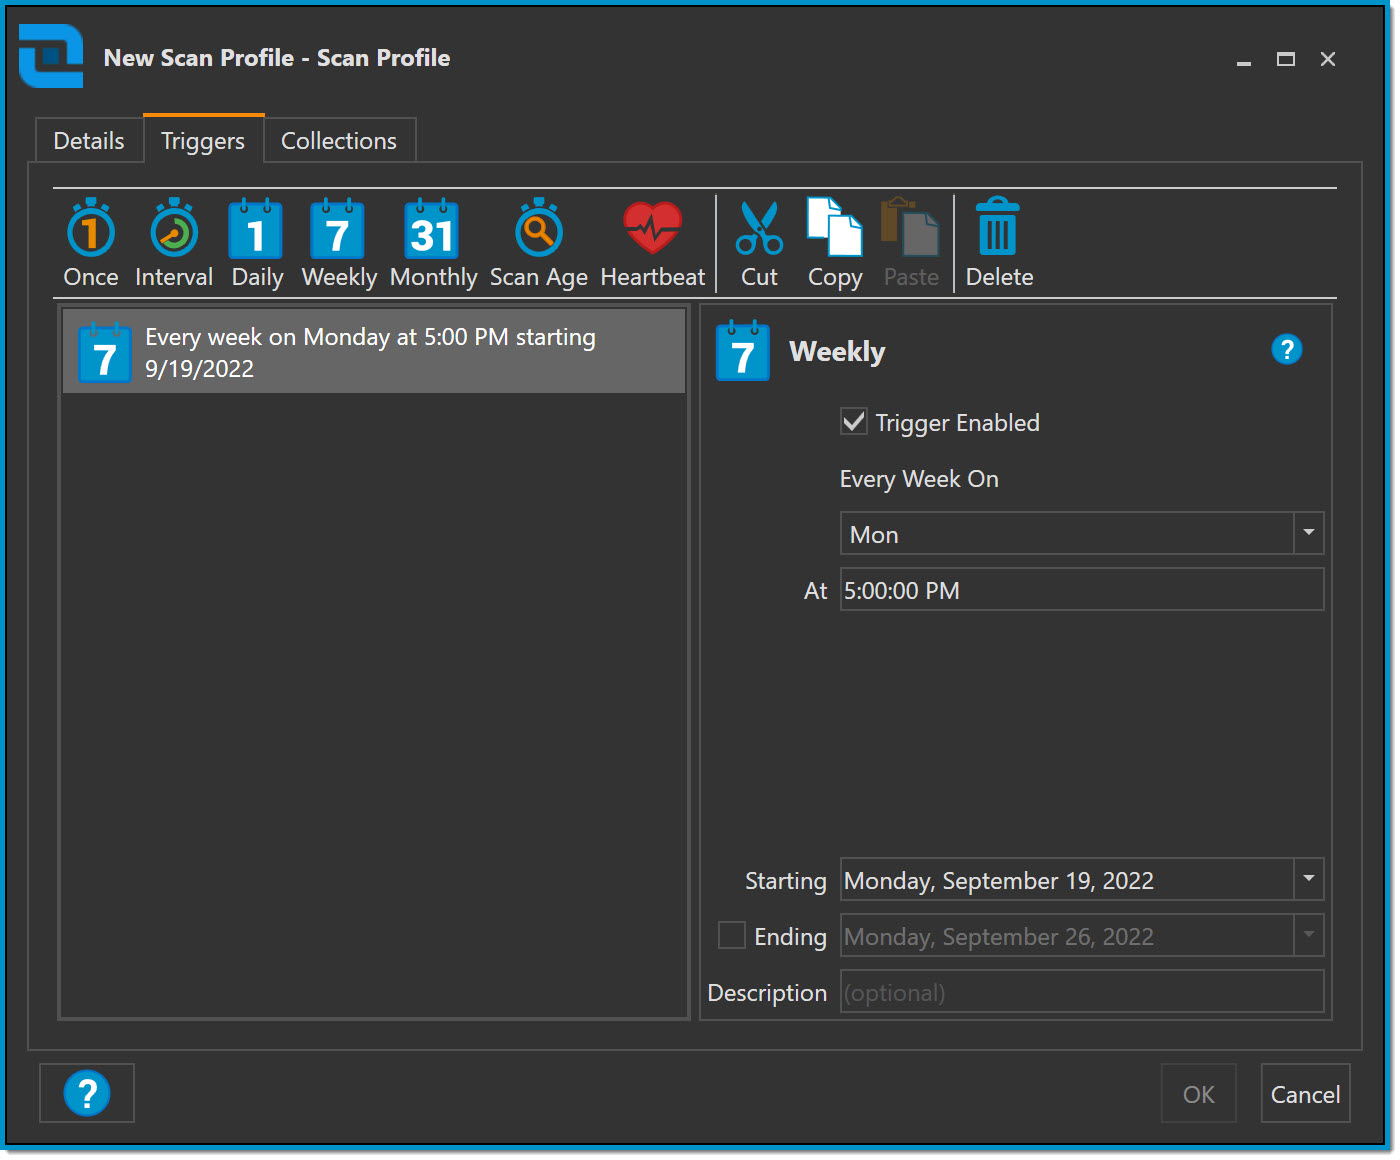
The Weekly trigger contains the following options:
- Every Week On - Configure the days & times that you wish for the Scan Profile to run every week (multiple selections allowed)
- Starting / Ending dates - Configure the Starting and optional Ending times for the Scan Profile
- The Starting time is the first time the Scan Profile will run
- The Ending date (Optional) is the last date the Scan Profile will run
Monthly - The Scan Profile will run every month on the configured days and times.

The Monthly trigger contains the following options:
- Every Month - Configure the days of the month and the time for the Scan Profile to run every Month
- Day of Month - Configure the date (or dates) of the month and time for the Scan Profile to run (multiple selections allowed)
- Day of Week - Configure the Scan Profile to run on the nth day of the month (multiple selections allowed)
- For example:
- The 1st & 3rd Monday of the Month
- The Last Friday of the Month
- The second Tuesday of the Month
- For example:
- Starting / Ending dates - Configure the Starting and optional Ending times for the Scan Profile
- The Starting time is the first time the Scan Profile will run
- The Ending date (Optional) is the last date the Scan Profile will run
Scan Age - Runs the Scan Profile against target computers when the time since the last scan crosses the configured scan age.
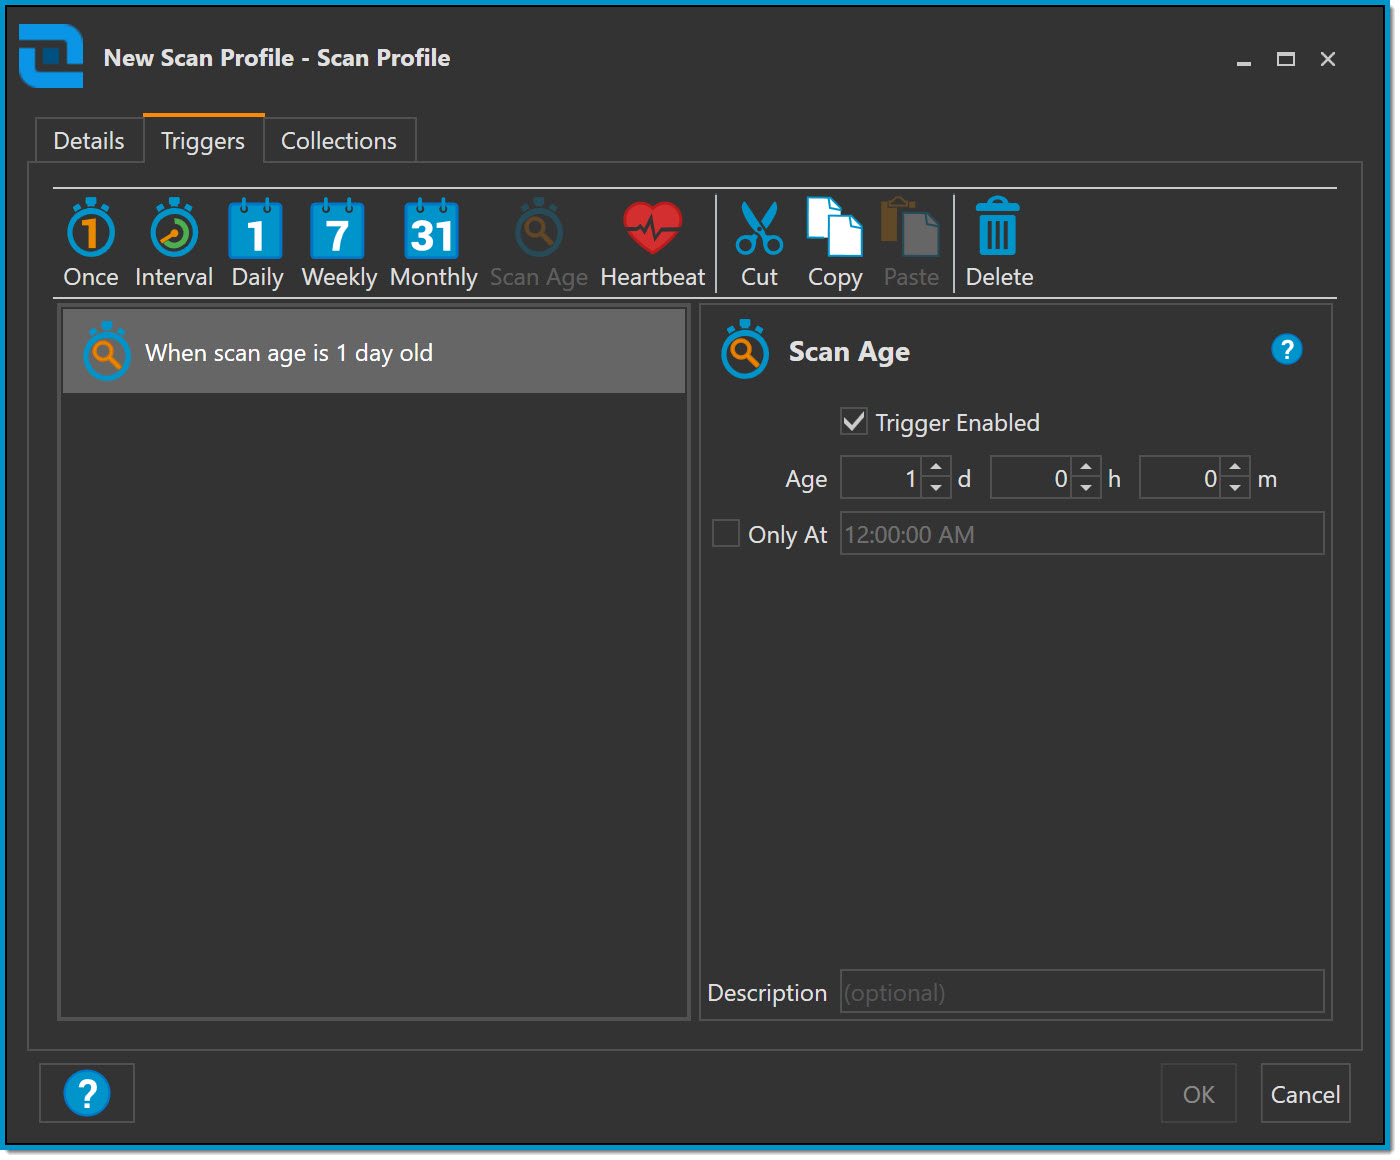
The Scan Age trigger contains the following options:
- Age d/h/m - The age of the last successful scan.
- Only At - (Optional) The time the Scan Profile will initiate the Scan.
Heartbeat - Runs the Scan Profile against target computers when their status changes from Offline to Online in PDQ Inventory.
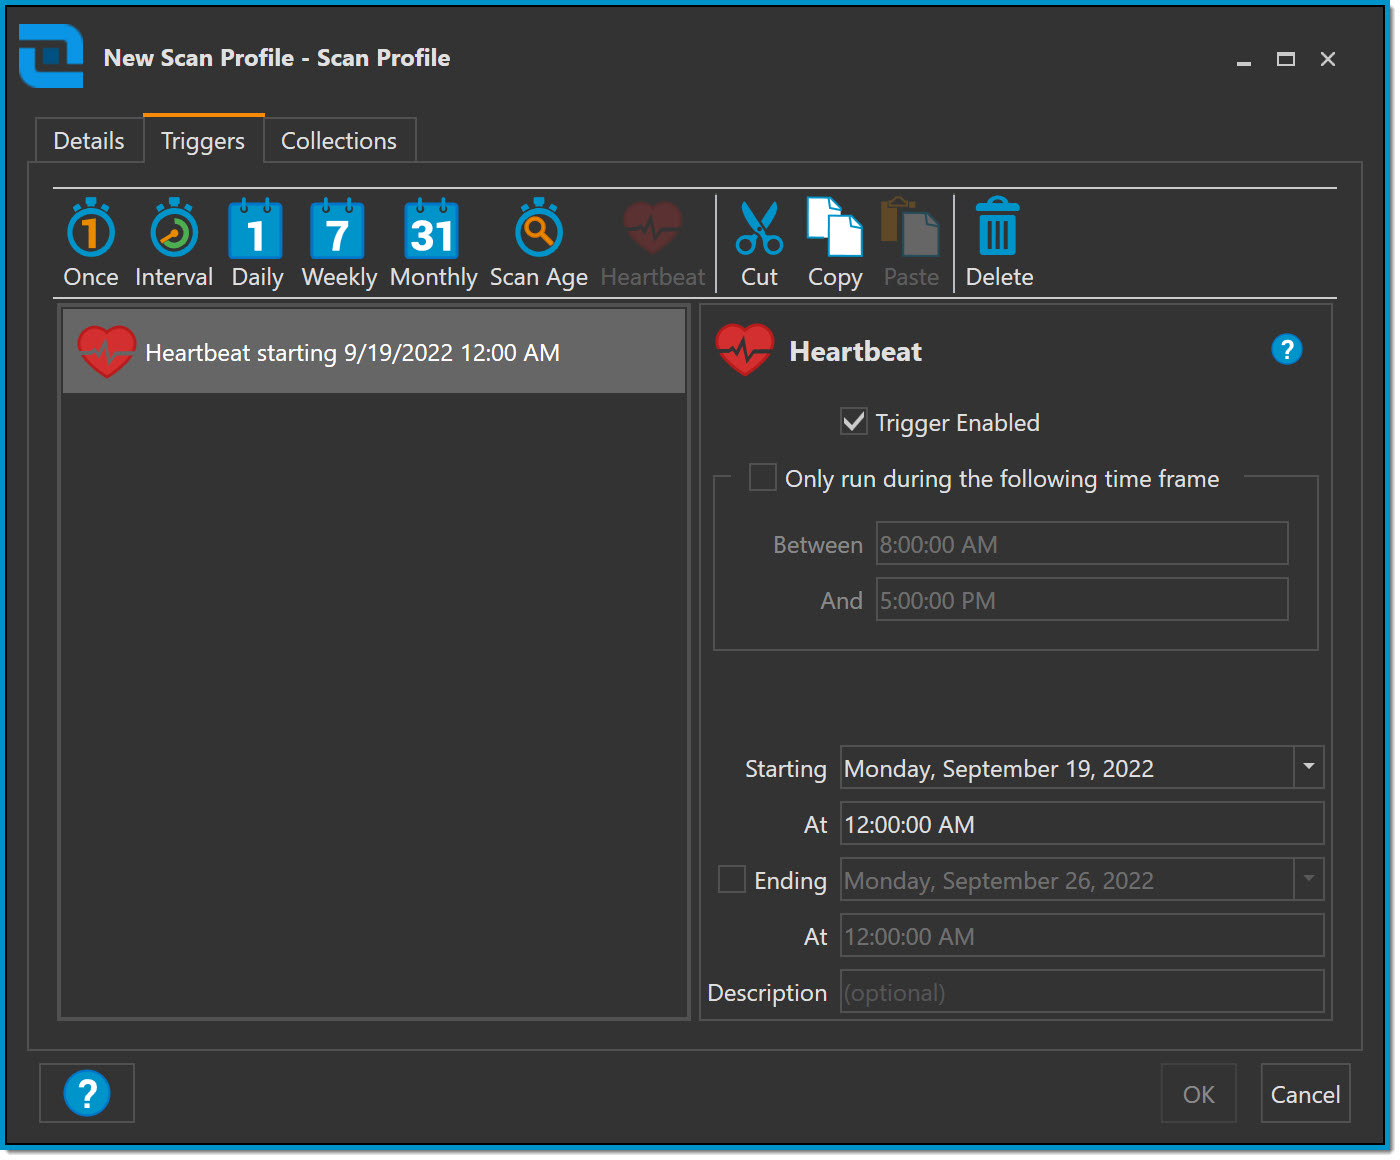
The Heartbeat trigger contains the following options:
- Only run during the following time frame - (Optional) Configure the times of the day for the Heartbeat Trigger to run the Scan Profile. Heartbeats detected outside of the configured time-frame will not receive the deployment.
- If the 'Between' time is set after the 'And' time, the trigger will run overnight.
- Starting / Ending dates - Configure the Starting and optional Ending times for the Scan Profile.
- The Starting time is the first time the Scan Profile will run.
- The Ending date (Optional) is the last date the Scan Profile will run.
Collections Tab
The Collections tab of a Scan Profile allows you to select which PDQ Inventory Collection the Scan Profile will run against. New Scan Profiles will default to All Computers.

To link a Scan Profile to a collection, select the Link To Collection(s) button on the Collections tab, and select one, or more, collection(s) for the Scan Profile to link to.

Types of Scanners
The following Scanners can be configured in a Scan Profile:
- Active Directory - Scans for basic Active Directory (AD) attributes as well as Active Directory group information. Data collected includes domains, descriptions, and containers.
- Applications - Scans specific locations in the Window Registry for all installed applications and available information about the applications. Data collected includes name, publisher, and install date.
- Note: Any applications which are installed for a single user (not for "all users"), will only be captured if the user is logged in at the time of scan.
- Computer Details - Scans for general computer information. Data collected includes boot time, operating system, processor, model, and serial number.
- Note: This scanner does not scan for Active Directory information or MAC address.
- Disks - Scans disk drives, including mounted USB flash drives, and their partitions (logical disks), if applicable. Data collected includes drive ID, size of the drive, BitLocker information, and free space.
- Note: Mapped network drives are not scanned as they are not considered local disks and are generally set per user and not per computer.
- Displays - Scans for all monitors and display devices. Data collected includes manufacturer, model, and serial number.
- Note: Without a vendor-supplied driver installed, a majority of the information provided by the manufacturer will be missing.
- Environment Variables - Scans for environment variables defined for the system or any users. Data collected includes %PATH% and %TEMP%.
- Files & Directories - Scans in specific locations for files & directories. For example, .exe files under C:\Oracle. Data collected includes name, path, size, modified date, and applicable file header information such as File Version and Company Name.
- Hardware Devices - Scans the physical hardware devices of the computer. Data collected includes class, name, and drivers.
- Hot Fixes - Scans for operating system hot fixes and other software updates. Data collected includes name, URL, and description.
- Memory Modules - Scans for the details of each memory module installed on the computer. Data collected includes speed, capacity, and model.
- Network Adapters - Scans the network interface card (adapter). Data collected includes the name, manufacturer, and MAC address.
- PowerShell - Queries based on the PowerShell script or file used.
- Printers (local) - Scans local printer information. Data collected includes name, description, and drivers.
- Note: Only printers installed on local ports are scanned (for example, USB, LPT, and TCP/IP).
- Registry - A fully configurable scanner that scans registry information based on the settings of the particular scan profile. Data collected includes hive, path, and value name.
- Services - Scans Windows Services. Data collected includes service title, name, account, and the state of the service.
- Shares - Scans all items that are shared on the network including system shares, disks, and printers. Data collected includes shares and permissions. Equivalent to the command, net share.
- Users & Groups - Scans local users, local groups, and local group membership. Data collected includes user, description, SID, and domain.
- Note: Domain controllers have no local users and groups and will return a null result.
- Windows Features - Scans the Windows component features and whether or not they are enabled.
- Windows Task Schedules - Scans information gathered from the Task Scheduler of the computer
- WMI - Queries the Windows Management Instrumentation (WMI) database.
Manually Initiating a Scan
To initiate a scan outside of the defined Scan Profile triggers, or to run a Scan Profile without defined triggers, perform one of the following actions:
- Highlight a collection in the tree that contains one, or more, computers:
- Select Scan in the toolbar and choose a Scan Profile from the list.
- Right click the highlighted collection and select Scan Collection > Choose a Scan Profile in the list in the context menu.
- Use the shortcut Shift+F6 to initiate the default Scan Profile
- The Keyboard shortcut will only initiate the default Scan Profile.
- In the main console, select one, or more, computers in a collection
- Select Scan in the toolbar and choose a Scan Profile from the list.
- Right click one of the highlighted computers and select Scan Collectios > Choose a Scan Profile in the list in the context menu.
- In the menu, select Computer > Scan Computers > Choose a Scan Profile in the list
- Use the shortcut F6 to initiate the default Scan Profile
- The Keyboard shortcut will only initiate the default Scan Profile.
Where to find Scan Results
To view a computer's scan results, double click the computer, right click > View Computer Details, or highlight the computer in the main console and use the shortcut Ctrl+O. Each scanner's data can be found in one or more pages from the pages list.

- Active Directory
- Computer page: Active Directory header.
- Active Directory Groups page
- Applications
- Applications page
- Computer Details
- Computer page: General, Operating System, CPU, and System headers.
- Disks
- Disk Drives page
- Displays
- Displays page
- Environment Variables
- Environment page
- Files & Directories
- Files & Directories page
- Hardware Devices
- Hardware page
- Hot Fixes
- Hot Fixes page
- Memory Modules
- Memory Modules page
- Network Adapters
- NICs page
- Computer page: MAC Address field
- PowerShell
- PowerShell page
- Printers (local)
- Printers (local) page
- Registry
- Registry page
- Services
- Services page
- Shares
- Shares page
- Users & Groups
- Local Groups page
- Local Users page
- Windows Features
- Windows Features page
- Windows Task Schedules
- Windows Task Schedule page
- WMI
- WMI page